Docker for Containerizing and Deploying MERN Applications
Learn how to utilize Docker to fully containerize a full-stack web application.

Abdullah Muhammad
Published on October 13, 2023 • 10 min read

Introduction
When working with application development and deployment. A common tool that can come handy in the process is Docker. This tutorial will not focus on every detail related to the Docker ecosystem nor will this article serve as an introduction to Docker.
Instead, we will be walking through many of its main features and use them for local development and deployment.
There are quite a few things we will cover such as the Dockerfile, commands, images, containers, Docker Hub/Client, how to setup a Docker network locally for container communication, and so much more.
Containers are lightweight, efficient, and easy to manage. They are isolated, standalone environments that contain all the code, packages, and dependencies required to successfully run an application.
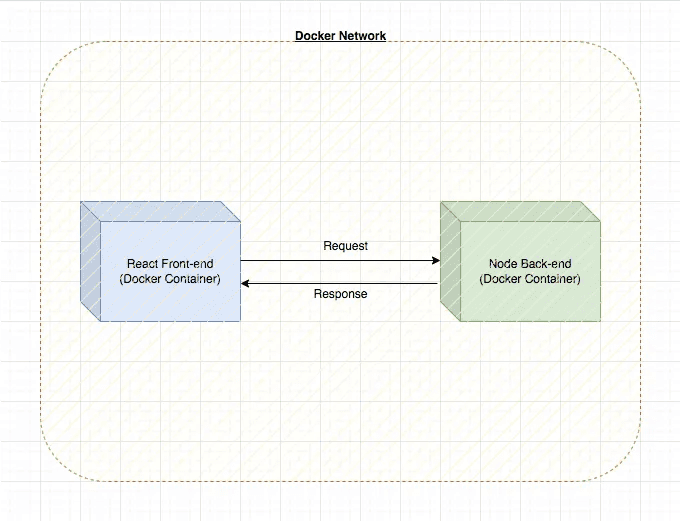
We will be working with a basic MERN application and incorporate Docker for containerizing both ends of the application.
In the end, the setup looks like this:
Code Overview & Docker Refresher
You can follow along by cloning this repository. Navigating to the /demos directory, the code for this project is located under /Demo23_Docker_Full_Stack_Deployment.
Dockerfile & .dockerignore
Navigating to the /frontend directory, you will find the following Dockerfile:
This Dockerfile is dedicated to containerizing the front-end portion of the application.
Navigating to the /backend directory, you will find the following Dockerfile:
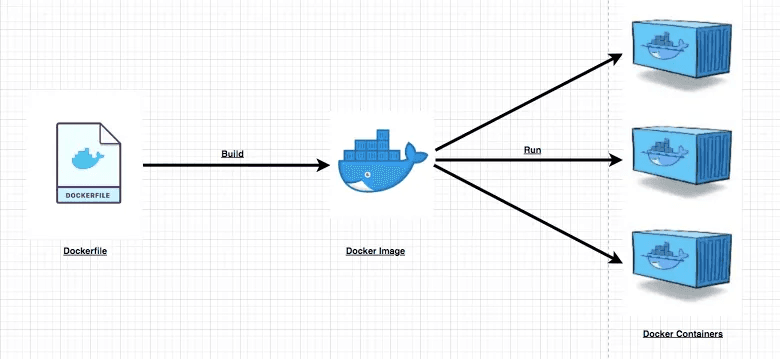
Dockerfile is the exact name of these special files and they contain instructions which allow Docker to build images. These images are essentially the base with which containers are derived from. You can think of Docker images like OS images in a cloud VM.
You run the VM, but the underlying infrastructure is defined by the OS image you select. A Docker container is not a VM, rather, it is lightweight and elegant enough to run an application.
An image generated from a Dockerfile is essentially code that can run in a Docker container. For example, in the files above, we use a set of commands defined by Docker which allow us to setup the following:
- Set base image (that would be *node, the : designates image version)
- Copy the local code to the container’s own working directory
- Run commands which allow the installation of necessary dependencies
- Run the environment to kickstart the application (npm start or node server)
These set of instructions are bundled together to form an image using the docker build command. The FROM, COPY, EXPOSE, WORKDIR, RUN, and CMD commands are common commands used in a Dockerfile to build images.
This is ultimately how it all works:
To optimize the build process, Docker offers a .dockerignore file which is similar to the .gitignore file. We can specify what we do not want copied over during the build process and this helps optimize the process.
In each of the server folders, you will find a .dockerignore file which contains the node_modules directory.
We do not need to spend significant time copying over this directory as we will be using the RUN npm install instruction in the build process to install the required dependencies.
Docker Images, Docker Hub, and Base Images
Once the image is built, we can store it locally or push it to Docker Hub. You can think of Docker Hub similar to GitHub when working with code repositories.
You have the ability to push and pull images (public images only) from Docker Hub which is a centralized location for storing and retrieving images. Images can be assigned names and tags for versioning.
There are thousands of images out there and some are even designated as official by Docker which allow you to pull them and run containerized applications. Some common examples are httpd, nginx, and so on.
If you want to spin up a web server, you could use these ready-made images. In the examples above, we are making use of a ready-made image for the Node.js environment.
In the each of the Docker files, we use the node image as the base image and proceed to build out a custom image for the React.js application (front-end) and the Node.js application (back-end) we will be running.
Docker Containers
Once an image is built, you can run it in a container which will run the environment containing the code bundle and dependencies required to sufficiently run the application.
You can run as many different containers from one image as you wish and even offer slight configuration changes to each of the containers, it is up to you.
Applications using different layers can be separated into different containers and communicate with each other in a dedicated network.
Containers can be deployed to the cloud and can be orchestrated for optimal performance.
In future tutorials, we will look at using Docker and AWS ECS in unison for containerization and cloud deployment.
For now, we will focus on local development and deployment.
docker-compose.yml file
The docker-compose.yml file is a special file which contains all the information to kickstart the containerization process.
Instead of running standalone commands to create images from Docker files, running containers from images, and having to create a dedicated network for containers to communicate with each other, you can simply write all your instructions in this single file.
For each of the different services, you will need to specify their characteristics such as port configuration, volumes, location of Dockerfile for the build process, and so on.
The following is an example of what a docker-compose.yml file would look like for a fully containerized React-Node application:
This file is located in the root directory of /demos/Demo23_Docker_Full_Stack_Deployment and contains all the instructions for building the images for both the front-end and back-end servers.
Their ports are also configured and docker-compose.yml creates a default network in which all these containers can communicate.
Pretty neat eh?
For the demo, we will not be using this file, but will focus on using Docker commands to better grasp concepts.
Demo Time!
It is assumed you have Docker installed locally on your machine. You will need it to follow along with the demo.
The Dockerfile in each of the server folders is key to building and containerizing each end of the application.
We can also make use of the Docker CLI, but we will not use it for this demo.
You can begin by starting Docker Daemon locally. It is essential for running background processes, containers, and so on. To put it in short, this means you start Docker from where you installed it initially.
Before we start containerizing, we need to create a Docker network in which the containers will communicate with each other. We will use the bridge network to communicate with other containers by their names.
To do this, you will need to run the following in your terminal:
docker network create <network-name> --driver bridgeIf done correctly, you should see the network ID returned on screen:

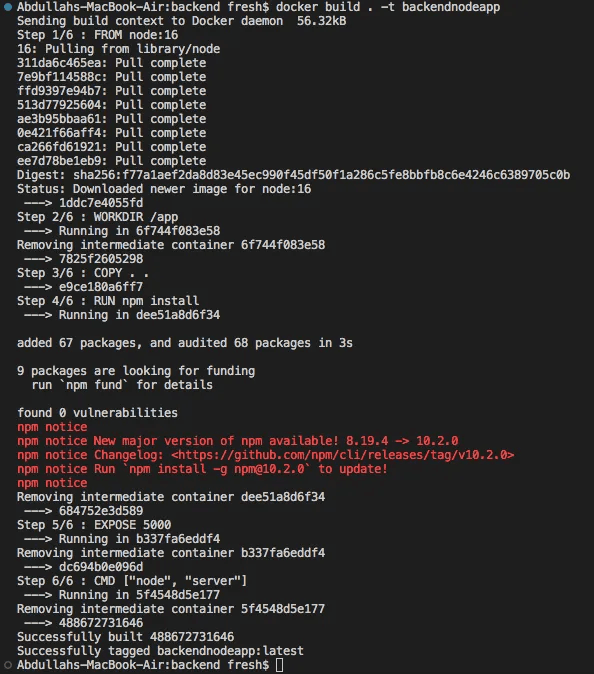
Once that is complete, you will need to run build commands to create images for each of the two servers. In /backend, run the following:
docker build . -t backendnodeappIf done correctly, you should see messages related to each step defined in the Dockerfile:
Similarly, you will need to run this command in the front-end. In /frontend, you should run this:
docker build -t . frontendnodeappIf done correctly, you should see a similar set of messages related to each of the build steps defined in the Dockerfile:
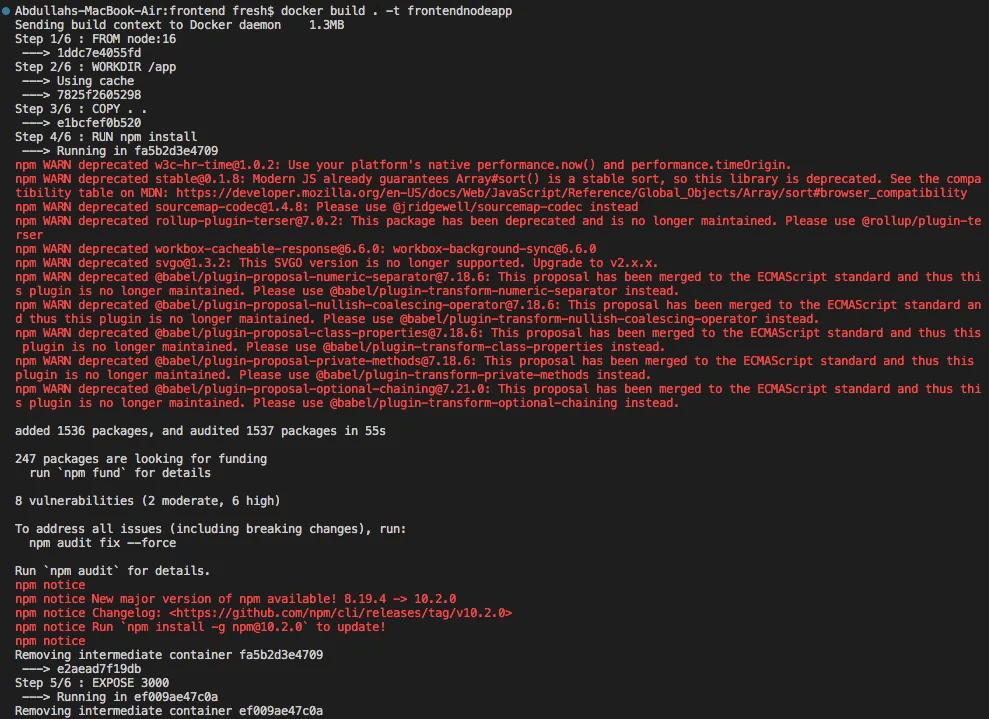
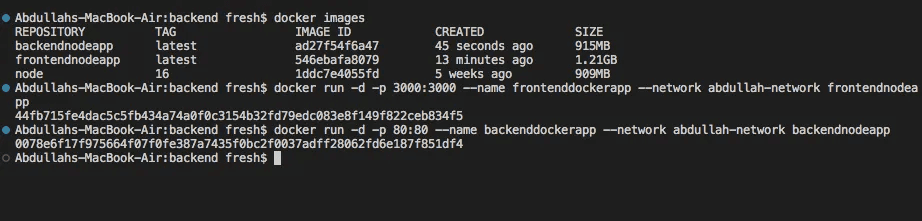
Ignore the messages, I had to use an older version of Node because of some internal compute issues. Nonetheless, this works. Running docker images will list all the images built and stored locally on your machine:

We have setup the docker network and images. Now we turn attention to containers.
To create containers from images, we can use the docker run command. We can run the following for both the front-end and back-end. We should see container IDs returned on screen after running each of these:
Backend:
docker run -d -p 80:80 --name backenddockerapp --network abdullah-network backendnodeappFrontend:
docker run -d -p 3000:3000 --name frontenddockerapp --network abdullah-network frontendnodeappIf done correctly, you should see something like this:
The commands above might look intimidating, but they are very easy to understand:
- -d flag specifies detached mode, meaning that the container runs in the background
- -p flag specifies the port the container is listening on and maps this to a local port so as to establish communication between container and host
- --name flag specifies the name of the container
- --network flag specifies the docker network you would like to connect this container to (remember containers MUST be in the same network for communication)
And finally, we assign the name of the image from which we want to run the container from.
You can view the containers live in action by using the docker ps -a command:
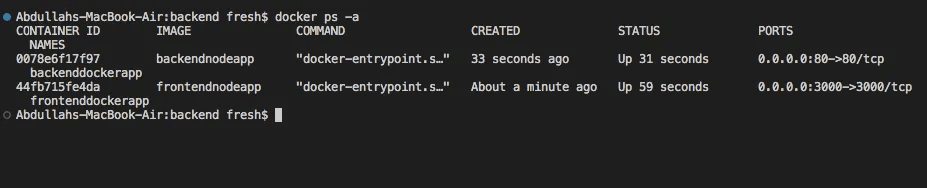
This will detail all the containers running as processes in the background. As you can see, we have two containers running.
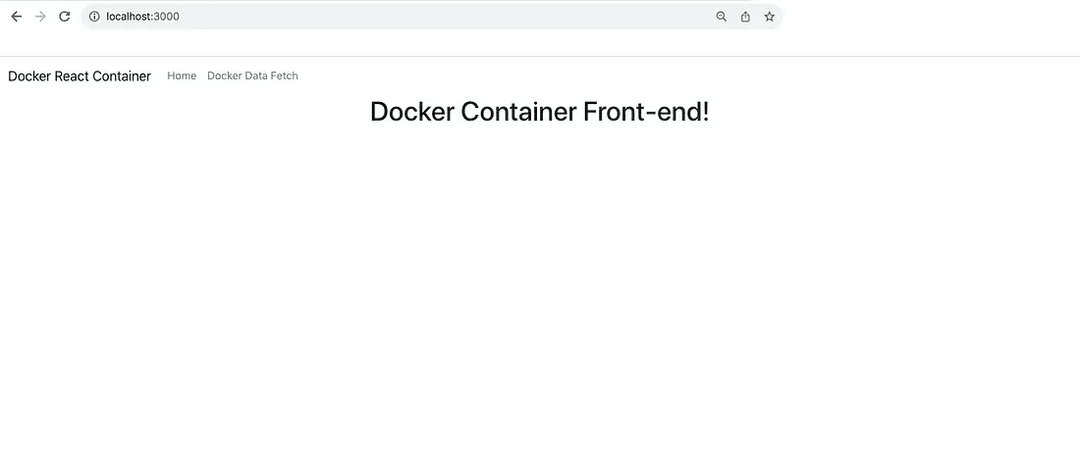
Since port 3000 is being used in the container and the same port being used locally to map communication, you can navigate to http://localhost:3000 and notice the new front-end container live!
We are making use of a back-end container for API calls. We can test this by navigating to the Docker Data Fetch section in the Navbar:
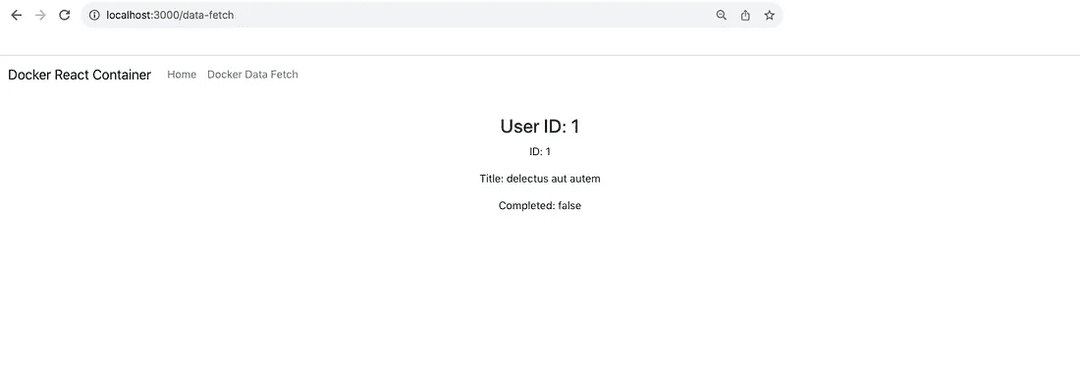
We can see the API data is fetched successfully from the back-end and can conclude that the setup works elegantly!
That is it for the short presentation. As you might have noticed, containers take up space.
We can stop these containers, remove them, and the images from which they were derived from.
To stop containers and remove them, you can run the following:
docker stop <container ID or container name>
docker rm <container ID or container name>
You must stop containers before you can remove them. If done correctly, you should see something like this:
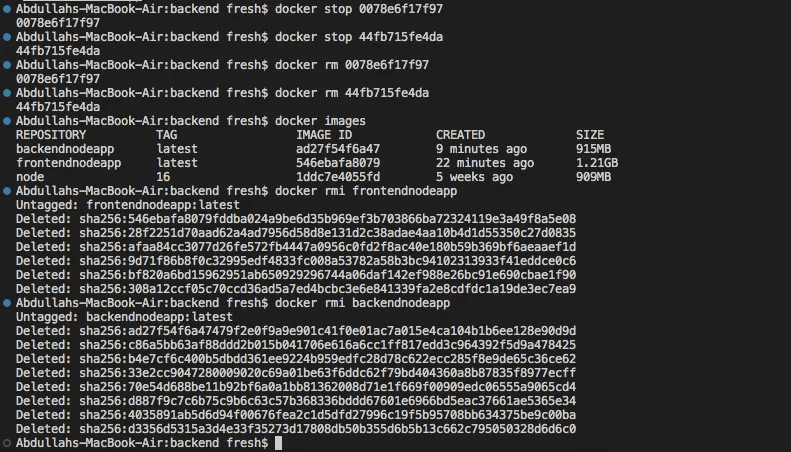
Each of the two server containers are stopped and removed using the commands above.
"But what about the images?"
If you want to keep those for future reference, you can. However, once no containers are dependent on a particular image, only then can they be deleted.
You can simply run docker rmi <image ID or image name> like it is done above to delete the images.
That is basically it! We detailed how to setup and configure the Docker environment, ran containers, and took things down step-by-step.
Conclusion
In this tutorial, we did a deep dive into Docker and saw how we could use it to create isolated environments for each of the servers we have been working with.
We looked at many of the rich features Docker has to offer, its ecosystem, and experimented with it using a sample application. Of course, there is a lot more you can do with Docker and in future tutorials, we will look at utilizing the cloud (AWS) for container deployment.
Containerization is key for building secure, scalable, and resourceful applications all the while making sure they are built in an isolated way.
We looked at the essence of Docker, the Dockerfile/.dockerignore files, Dockerfile commands, Docker network, Docker images/containers, the docker-compose.yml file, image features, Docker Hub, and so much more.
Below are the links to the GitHub repository used for this demo and various resources related to Docker that might be helpful to you:
I hope you enjoyed this tutorial and look forward to more in the future.
Thank you!