An Introduction to the MERN Stack
Learn how to create scalable and maintainable web applications using the MERN stack.

Abdullah Muhammad
Published on July 3, 2023 • 8 min read

Introduction
Web Development has come a long way since the ‘90s. Long gone are the days of static HTML pages with the classic Times New Roman font.
New frameworks are being created and worked on by developers. Most will not make it, but the ones that do, change the space in a dramatic way.
That is not to say, one is better than the other. Often times, it is a matter of preference. You can make full stack websites using Linux, Apache, MySQL and PHP aka. the “LAMP Stack” and get by just fine.
But as companies evolve and as newer frameworks and libraries come about, the “shiny toy syndrome” kicks in.
The Stack
The main focus for today though, will be the MERN stack, but in particular, React and Node. So what is MERN? It stands for Mongo, Express, React, and Node. Mongo is a JSON document-based non-relational database. Express is a minified version to Node in that, backend development is made easier and React of course, is the frontend client side library.
The simplicity lies in the fact that, at the heart of it all, Javascript is all that is required to work with this stack.
An advantage over the aforementioned traditional old-school stack, where you need to learn Javascript, MySQL, and PHP, things can get complex in a hurry.
A Word of Caution
Often times, newbies will jump right into these frameworks thinking they have it all figured out. It is a moot point to learn any of these if you have not nailed the basics.
You still need to learn and master plain “vanilla” Javascript before diving headfirst into any of these.
“Wait.. what is the point of learning any of these frameworks if I can get by using Javascript?”
The point is you do not have to.
The goal of these frameworks and libraries is to help expedite the development process by helping developers work with out-of-the-box solutions instead of creating everything on their own.
MERN Stack in Action
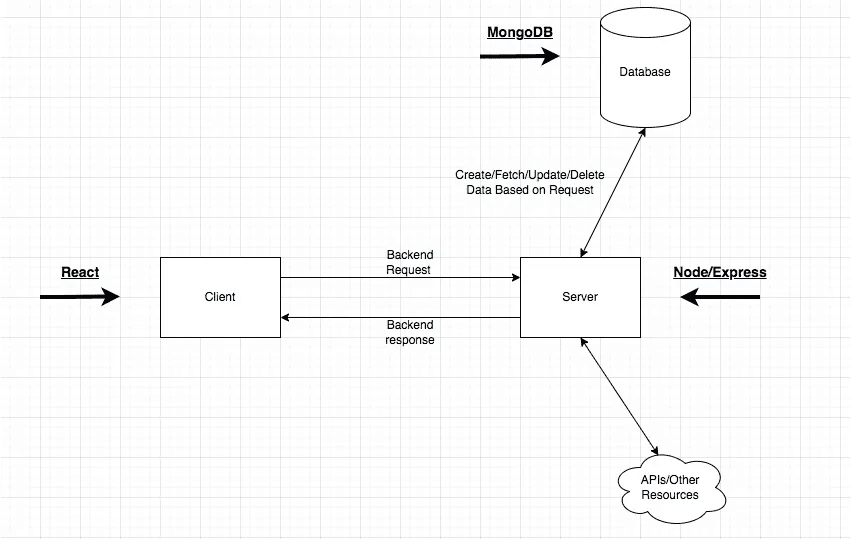
For the simplicity of this article, we will be working with a basic client-server architecture and will not incorporate a database into the article.
Here is the birds-eye view of how it would all work (including a database):
MVC Architecture
The MERN stack closely resembles a common pattern in software development known as the MVC (Model-View-Controller) Architecture.
We will not dive deep into what it is, but just know that the Model typically represents objects (Database), View represents what is seen by the user (Frontend server, client side), and Controller (Backend server, server side) is where all the interweaving between the Model and View takes place (API calls, database interactions, etc.).
“So we are essentially running two different servers, communicating with each other?”
The answer is yes. The frontend server is using React and the backend server is using Express/Node.
Okay… enough talking.
Demo Time!
You can follow along by cloning this repository.
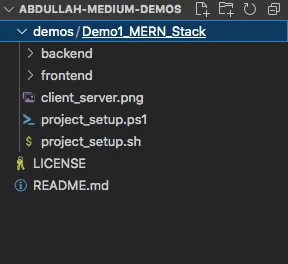
If you are using VS Code and did it correctly, you should open and see this:
Installing Dependencies
Since the node_modules directory was not committed to Git due to its size (check the .gitignore files in the front/backend folders), we need to install the necessary packages to make the project run.
Run the following commands in the /demos/Demo01_MERN_Stack directory:
cd frontend

npm install

cd ../

cd backend

npm install
As you can see, we cd into the frontend folder and ran npm install.
This looked for the package.json file and the list of dependencies. We moved back up a level and likewise did the same for the backend folder. You should notice the node_modules directory in each folder if done correctly.
What is NPM?
NPM stands for: Node Package Manager. Like other languages, NPM is a package manager for the JavaScript programming language. Official packages and third-party packages can be found here. It is an integral part of the Javascript ecosystem.
Now that the project is setup, time to dive into the code!
Code Dive In (Frontend)
In /demos/Demo01_MERN_Stack, you should find the /frontend/src/App.js file:
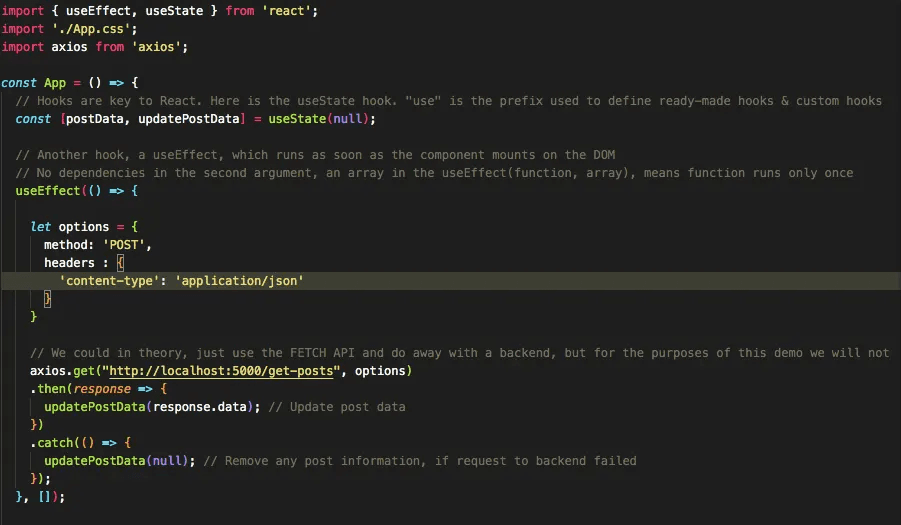
This is React. We are making use of its rich features such as hooks, functional-component based architecture, and have incorporated Axios which allows us to send a call to the backend server to fetch us mock data.
Axios is a promise-based HTTP client so making calls has never been any easier! We are assuming the backend is running on PORT 5000 and has an endpoint /get-posts available.
If the promise is resolved, we update our post data state, otherwise return an error.
Just under all that code though, you will find this:
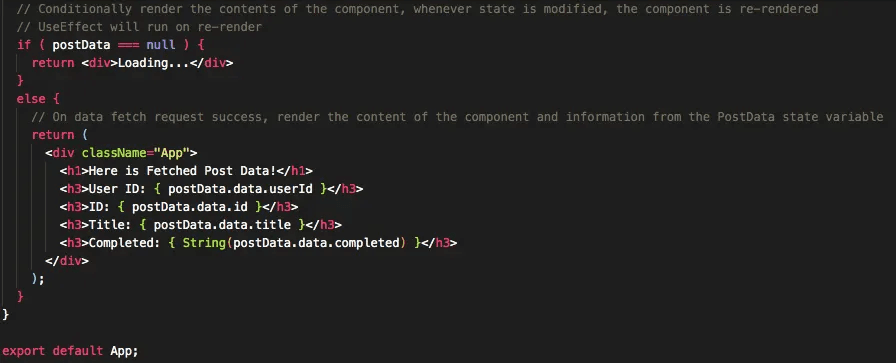
Once the state is updated upon a successful call to the backend, contents of the data are rendered to the DOM.
React is a component based library, so custom components we design are in separate files (usually .jsx or .js files). In this case, the App.js file is a separate component and can be nested into another component using HTML tags.
This is known as JSX which is essentially, syntactical sugar. That is not exactly how components are rendered (behind the scenes, React.createElement() is used to render components), but for human readability, we can write them as such.
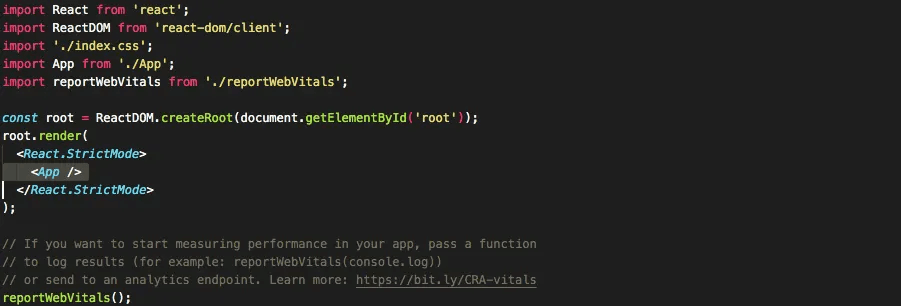
Here is the main index.js file under the same folder, containing the client code wrapped in HTML tags:
Backend Dive In
Now lets do the backend server! Under the backend folder you will notice a server.js file. This is the main file and the backend server will run using this:
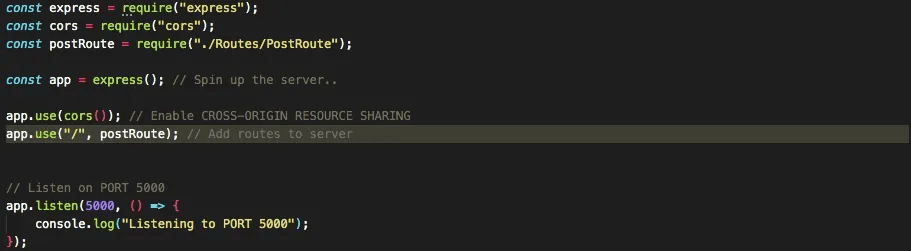
As you can see, we are making use of Express to spin up the backend server and have enabled CORS. For security reasons, requests outside the port are blocked, but since we are running two servers on two different ports, we will need to enable Cross-Origin-Resource-Sharing.
Notice also, that the backend server is listening on PORT 5000. So this coincides with the frontend server call (localhost:5000) and should go through.
We have also made a custom route available, PostRoute which we will dive into momentarily.
Under /backend/Routes/PostRoute.js:

As you can see, we are making use of Express Router which allows us to create custom routes using methods: PUT, PATCH, GET, POST, and so on.
We pass in custom controllers to map these endpoints which fulfill the request-response loop.
Under /backend/Controller/PostController.js:
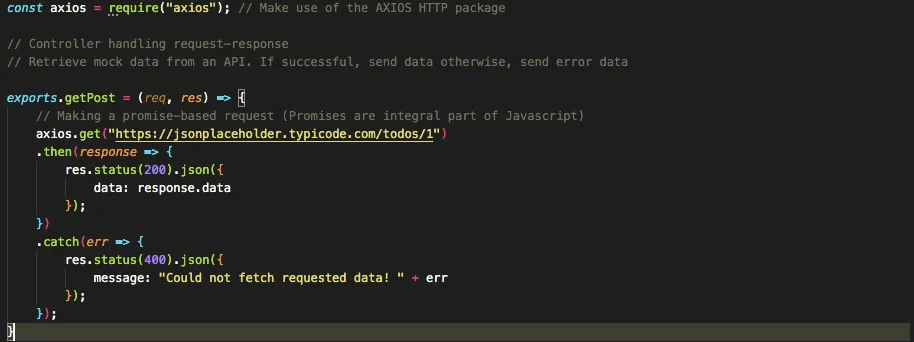
As you can see, this is the heart of where all the action takes place. The Router simply maps an endpoint to a controller method and the backend server processes the frontend request and sends the data back the other way.
HTTP calls are stateless, meaning one call does not carry merit to another. In a single request-response loop, we can have middleware functions which are intermediary functions that process data and pass on to another function before finally sending back a response (a common example can be, say, authenticated/protected routes).
Once a response is sent at any point during this process, no further action can be taken. This process loops again when another HTTP call is made and so on.
But to keep things simple, we will stick to one function only and send the response back as appropriate. We are using a mock API (JSONPlaceholder), making a call to fetch one post, and sending back a response to the frontend containing this data.
Link to this API can be found here.
Ready for Take Off!
Now that we have walked through the code, it is time for launch! By default, React chooses PORT 3000 to run client code so the frontend server will be running there. The backend server will run on PORT 5000.
In order to do this properly, you need to run the backend first as the frontend depends on that server for proper functionality.
On a terminal, make sure you are directed into it the backend server (run cd backend) and run the following:
node server.jsIf ran correctly, it should display “Listening on PORT 5000” on the console:

Congrats! Now, on a separate terminal window, make sure you are directed into the frontend server (run cd frontend) run the following:
npm startThis is the equivalent to running: react-scripts start, but that runs under the hood. This can be found in the package.json file for the frontend server under scripts.
Upon successful launch, you should automatically see your browser launch and display a page with the following:
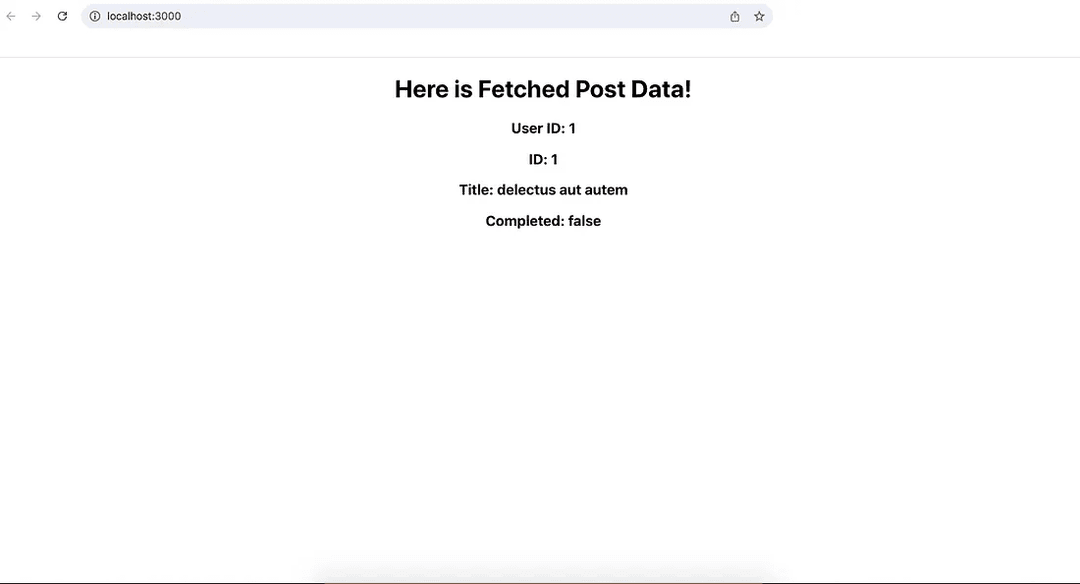
If you see this, CONGRATS! This is the frontend server in action (PORT 3000) making a call to the backend server which fetched mock JSON data and rendered it to the screen!
Conclusion
That was a lot for an introduction. Congratulations on making it this far. This article was specifically designed for beginners in mind.
This is a very basic setup and complex applications can be built on top of this very simple foundation.
Take it step by step, play around with the code, make your own components, set up your own custom controllers, and so on.
I will link the Github code here.
And stay tuned for more demos in the future! I hope you found this content helpful and look forward to more articles down the road!
Thank you!