MongoDB + Node.js: JavaScript for the Back-end
A comprehensive guide for utilizing MongoDB for JavaScript based applications.

Abdullah Muhammad
Published on July 16, 2023 • 11 min read

Introduction
In the first article of this series, we discussed the MERN stack and how JavaScript could be used for the back-end of applications.
Today, we will dive further into the back-end of a sample web application and see how easy and simple it is to establish communication between a database and a server.
Here is the point of view:
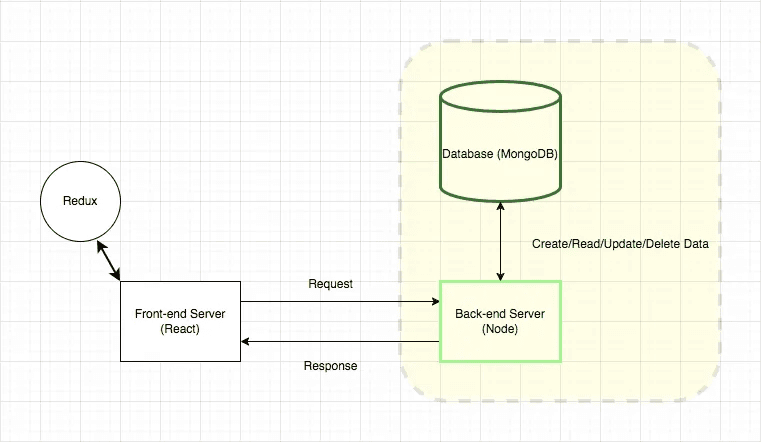
CRUD: Create, Read, Update, and Delete
In the demo, we will cover database interactions. More importantly, those that follow the CRUD pattern.
What is CRUD? It stands for Create, Read, Update*, and Delete. You can consider these to be the most basic operations you can perform with databases.
The names speak for themselves. Create allows users to create data and insert it into a database. This can be done in bulk or one by one. Read is an action that enables users to query data, often times with filters, for specific data fetching requests.
Update is a common action a user can perform to update data. Again, like reading data, multiple records can be updated within a database using a filter or one by one. Finally, Delete as the name implies, allows users to remove records from a database. This can be done one by one or in bulk using a specified criteria.
Relational & Non-Relational Databases
If you have worked with MySQL or any variation of SQL (there are tons out there), you will have come across a concept of “enforcing schema”.
You see, within a database, there are a collection of objects. It is NOT just a massive heap of data.
Objects within a database could represent indexes, tables, and so on. In fact, SQL has a subset language used to create these objects known as, Data Definition Language (DDL).
The data is stored in tables and that is where the “enforcing schema” concept comes into play. When we define the table structure in SQL using DDL, we are essentially setting rules that dictate what data can be inserted into the table.
"But, what describes how we can interact with these objects?"
Aside from DDL, another subset language in SQL that describes *how we can interact with database objects is known as Data Manipulation Language (DML). That is where the basic operations mentioned above (Create, Read, Update, and Delete) come into play.
We write commands against the table (residing inside a database) to “manipulate” the data stored there.
"Great! But, so far you have talked about SQL. How does this relate to MongoDB?"
The difference between SQL and MongoDB is that, SQL is a Relational (Schema-Enforcing) Database. MongoDB is a Non-Relational Database.
We saw that SQL wants data inserted in a certain way (schema-enforced). MongoDB on the other hand, does not. I mean you could enforce schema in MongoDB if you wanted to, but structure within a Mongo database is different to SQL.
In short, tables within SQL are thought of as Collections in MongoDB. Records, as they are referred to in a SQL table are thought of as Documents in MongoDB Collections.
MongoDB harnesses the power of JavaScript because it uses JSON as the method of data storage and nothing else. A single record stored in a MongoDB collection is considered a document and is represented as a JSON object.
If you were working with SQL, you would need to learn it as separate language altogether.
JSON fits like a glove and that is why working with MongoDB along side Node.js for any back-end of a web application is a powerful combo.
Mongoose: A MongoDB JavaScript Library
Similar to what Express.js is thought of as when working with Node.js, you can consider Mongoose to be similar to that when working with MongoDB.
What I mean is that it makes initiating database interactions from a server a piece of cake and we will see this in the code overview.
Whether it is establishing a connection to a cloud database or inserting documents to a collection, Mongoose is a comprehensive library that allows users to take these actions seamlessly.
Link to the Mongoose library can be found here.
Code Overview
All code can be found under the /demos/Demo03_Mongo_Node repository. The link to the Github repository will be provided later.
The sample web application is a User Portal. It is a simple application that allows anyone to create, read, update, and delete an existing user.
User Model
The back-end makes use of one Model and it represents a user. We are making use of Mongoose to create it (/backend/Models/User.js):
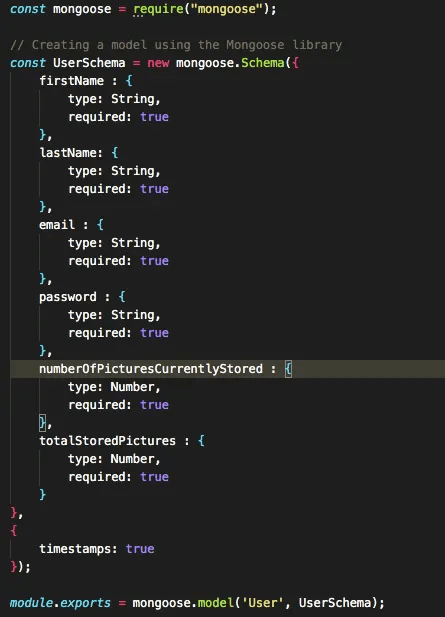
As mentioned previously, schema is not enforced in MongoDB. However, using Mongoose, we can create a schema for the model. This provides a representation of what is acceptable data that can be inserted into the collection.
Mongoose has additional flags which we can pass into the schema such as the timestamps flag which, when set to true, creates two self-managing attributes within our schema known as: createdAt and updatedAt.
Lastly, we wrap the schema into a collection called User and the schema is a representation of what a single User document will look like when inserted into the User collection.
User Controller
The Controller file is where we initiate calls to the database using a server. As discussed in the first article, the Controller in the MVC pattern is where the interweaving between the View (Client) and Model (Database) takes place.
We can set separate functions for each of the four CRUD operations in the controller file (/backend/Controllers/UserController.js):
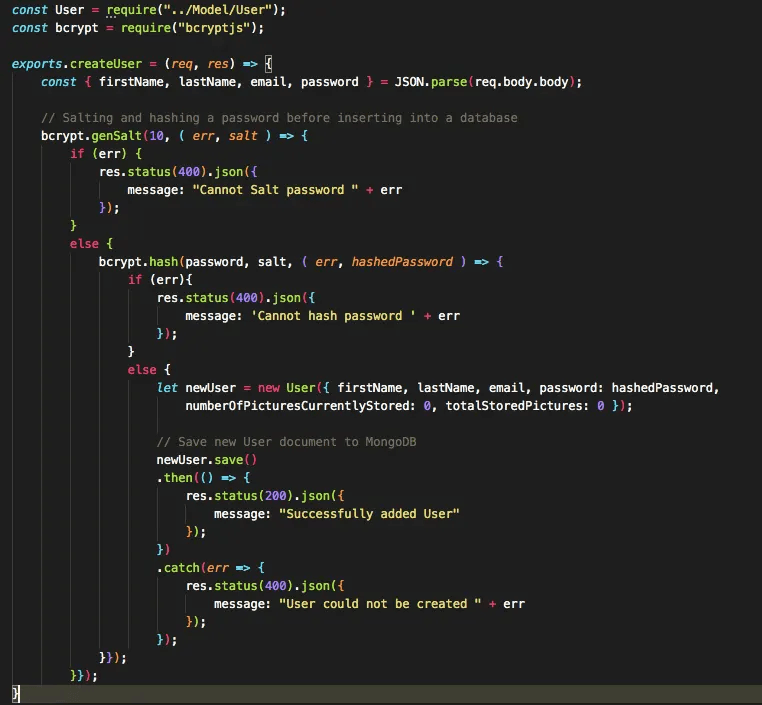
As discussed in the React-Redux article, we are using the bcryptjs library to salt and hash passwords before storing them into the MongoDB collection.
Also, we are making use of the exported User Mongoose model to seamlessly save new user documents based on the form data submitted from the client-side.
Further below, we find this:
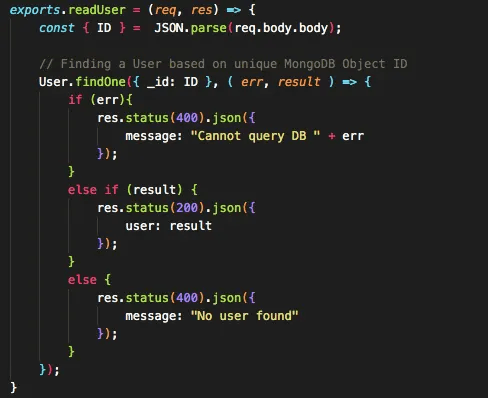
Mongoose has a built-in Object ID (represented as _id) which it uses to uniquely identify documents inside any collection. You can think of this as an equivalent to what a primary key column represents in a SQL table. Every document inside a collection in MongoDB has this attribute automatically generated for them.
You can design your Mongoose schema in such a way that you have designated a primary key attribute, but MongoDB will not enforce it. MongoDB will always generate a unique Object ID that describes each document inside any collection.
findOne() is a common Mongoose function and we are using it and the built-in Object ID to fetch data of the unique user that is represented by this ID.
Going deeper into our UserController.js file…
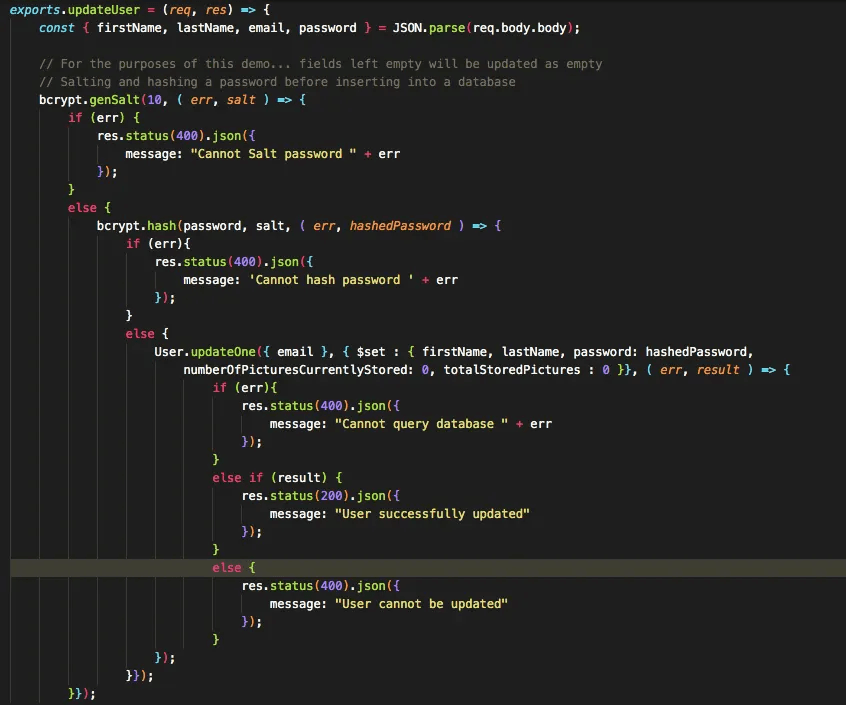
Similar to the create user function, Mongoose has a built-in function called updateOne() that allows us to update document(s) based on a condition. We decide how to update document(s) using an operator which is passed in as an object using the $set operator.
In this case, we are updating those documents (only one as email is unique) that contain the specific email which is given by the client.
Operators in MongoDB can be thought of as special symbols that allow for the carrying out of mathematical or logical operations. They are represented by a dollar sign in the front. Some examples include: $set, $eq, $gt, $lt, $lte, $ne, $and, $or, $nor, and so on.
Some of these can come handy when filtering data to be updated or deleted.
For a full list and more, you can visit the official docs here.
And lastly,
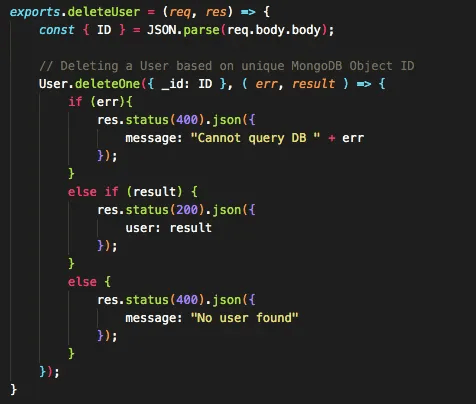
Similar to the read user function, we are incorporating the MongoDB Object ID to delete the requested document using the Mongoose deleteOne() function.
Routes
We map the controller file using the Express Router and we can simply assign create/read/update/delete-user as the four unique routes:
Under (/backend/Routes/UserRoute.js):

Node Server
And finally, the Node server which we spun up using Express:
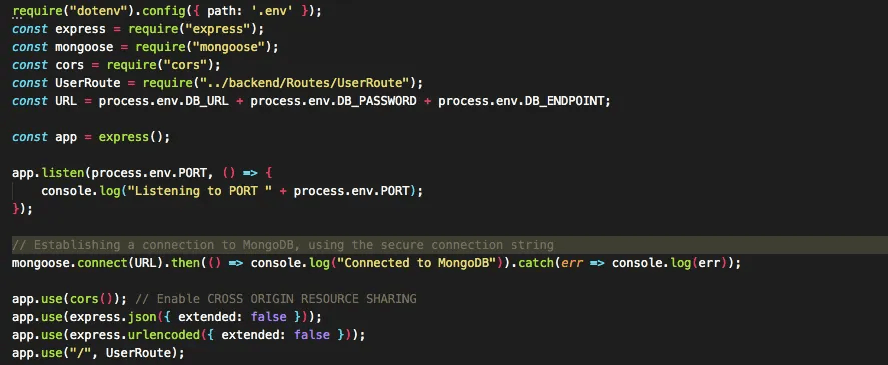
It is important to note that we are specifying the database connection here. We use the built-in Mongoose function connect() and pass in the URL which we obtain when we first create the cluster using MongoDB Atlas.
This is how the server will be able to perform the requested actions on the specific database we want.
If you do not know what MongoDB Atlas is at the moment, do not worry we will cover this later.
Dotenv Library
What is Dotenv? It is literally just that, .env! A special file where we store sensitive secrets and credentials used in the code without actually leaking it to the public.
process.env represents a global object containing all the environment variables of the environment our application is running in. It is important NOT to commit the .env file to any public repository.
Rather, you should use it locally and have it mentioned in a .gitignore to prevent accidental commits. These also serve as placeholders so developers, who view code publicly, will be informed that they will need to add their own credentials in a separate .env file in order to make things work.
Frontend Overview
We will not dive into the frontend code as that is not the focus of this article. However, we are making use of React and React-Router for the client side code in this simple demo.
Demo Time!
Now that we have walked through the code, it is time for a demo! Link to the Github repository is here. The directory we will work with is concern is /demos/Demo03_Mongo_Node.
Inside this directory, you will find two sub-directories. The frontend directory corresponds to client side code and the backend directory corresponds to server side code.
Make sure to run npm install in each of the sub-directories to ensure the appropriate modules are downloaded so the servers can run properly.
We will be using MongoDB Atlas as the database service. Link to the multi-cloud database platform is here.
You can sign up for a free cluster and be assured you will not incur any costs.
I have already set up and used a free cluster so I will be using that for this demo.
Make sure that when you are cloning this repository locally to add your credentials wherever specified (process.env.variable_name).
As usual, the client server will run on PORT 3000 and the Node server will run on PORT 5000.
You should be able to start each server on a separate terminal window. Once complete, you should get the following:

This is the home page of the User Portal application.
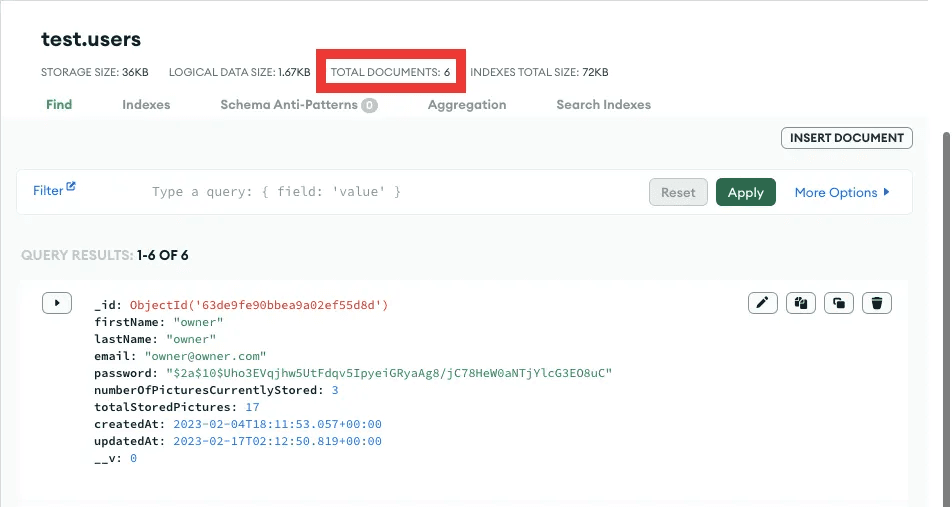
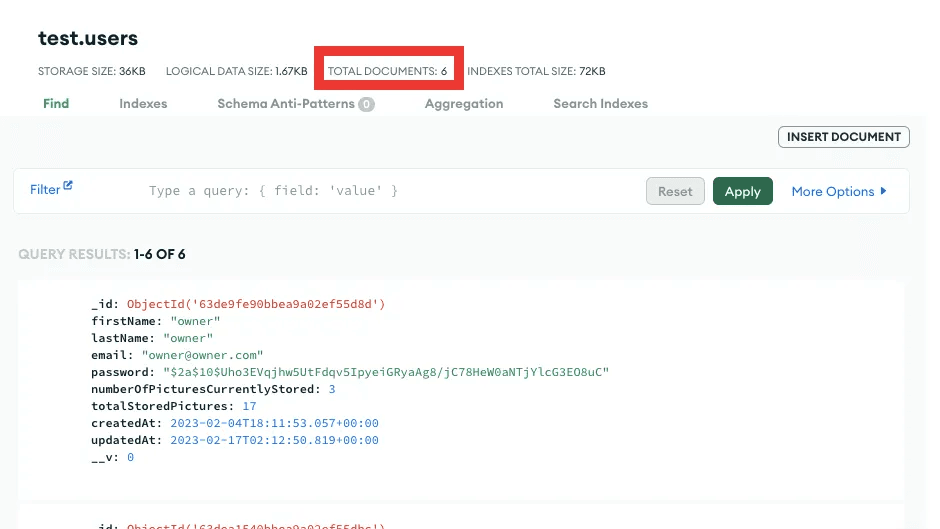
Switching over to MongoDB Atlas, here are the current documents existing inside my MongoDB Atlas cluster. As you can see, there are six documents:
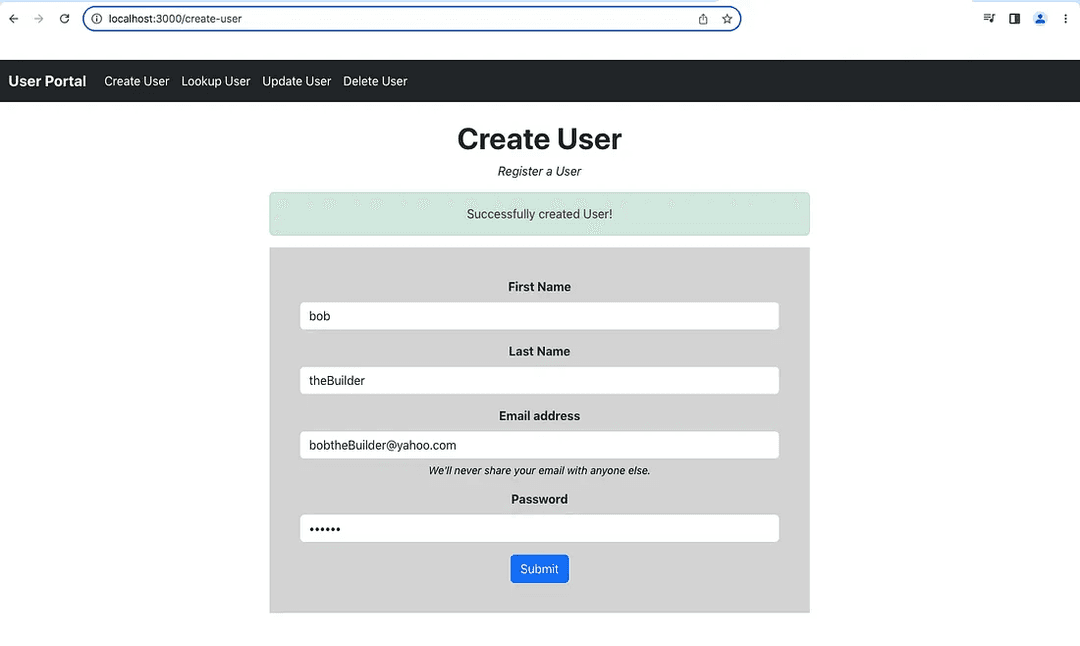
Create User
Let us proceed and create a new user and submit the request. If done correctly, you should get the following:
This is what the MongoDB Users collection looks like now. It has added one more document to the collection and the newly created user is highlighted below:
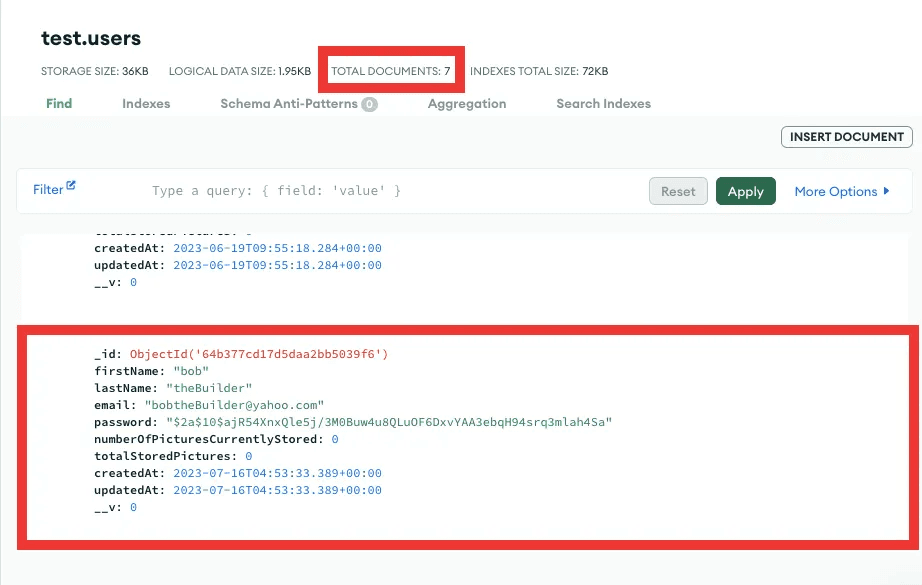
As you can see, the user aligns with the schema we had created earlier. The password is hashed, and additional fields such as Object ID, createdAt, and updatedAt were automatically added to this document by MongoDB.
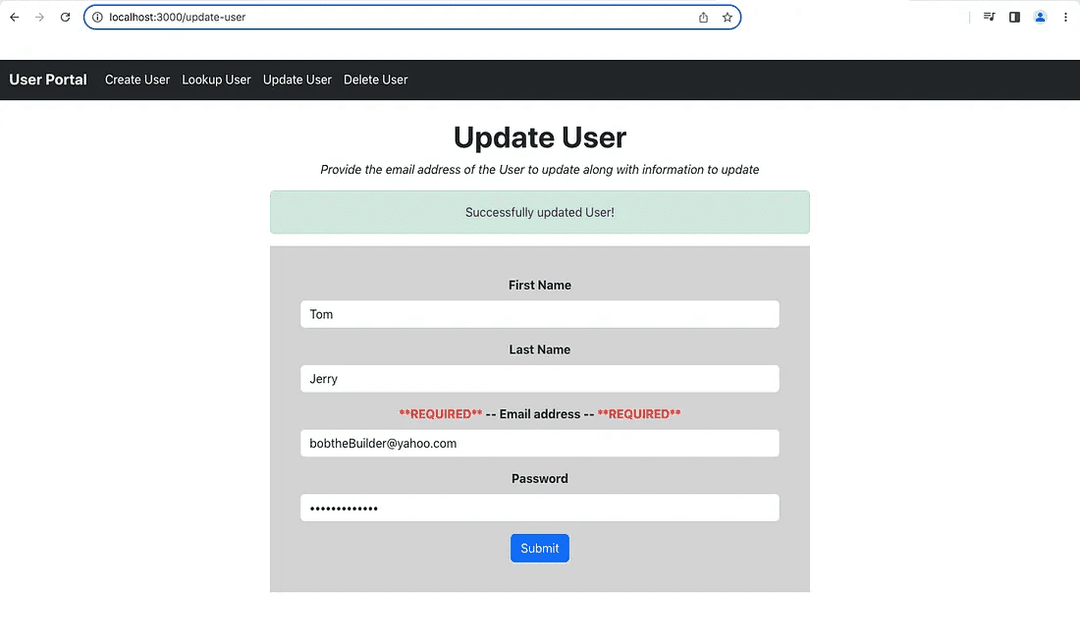
Update User
Now let us update this newly created user. Head over to the Update User section of the portal and complete the form. Remember emails do not change, so the email cannot be updated. If done correctly, you should get the following:
This is how our MongoDB Users collection looks like now:
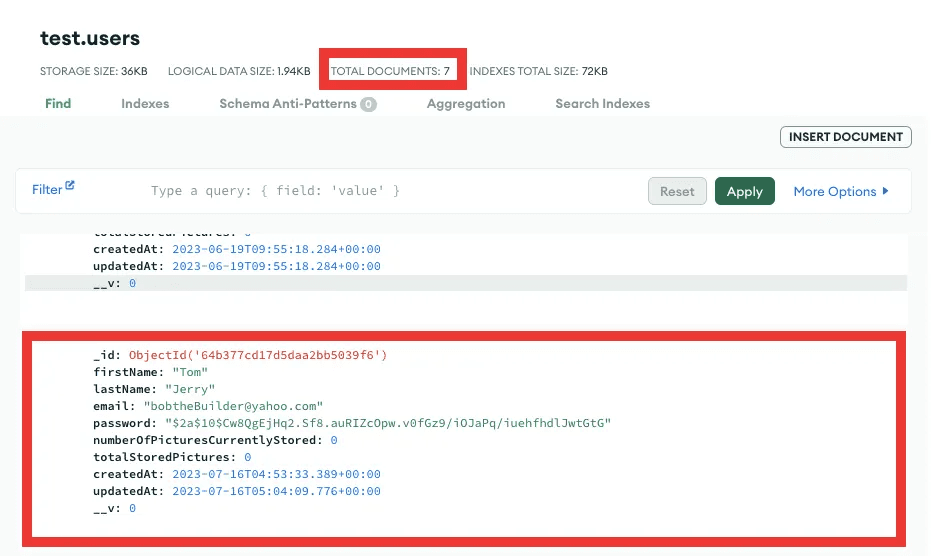
The first and last name attributes recorded their changes. MongoDB automatically updated the updatedAt attribute. It does so whenever updates are made to a particular document and you can see the timestamp reflect that.
Read User
Now let us read the information about this user using the built-in Object ID as the filter. Head over to the Lookup User section of the portal and use the Object ID of the document in your cluster and submit the form.
If done correctly, you should get the following:
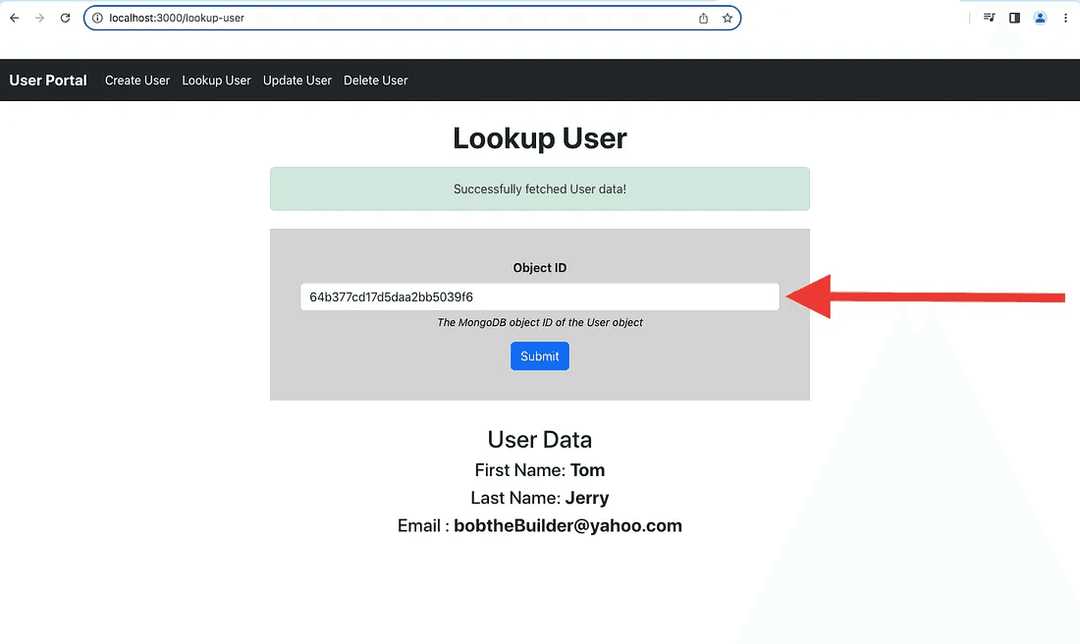
You can see this is the correct user as the data we are displaying corresponds to what is stored in the database. The updated first and last names along with the email address of the user.
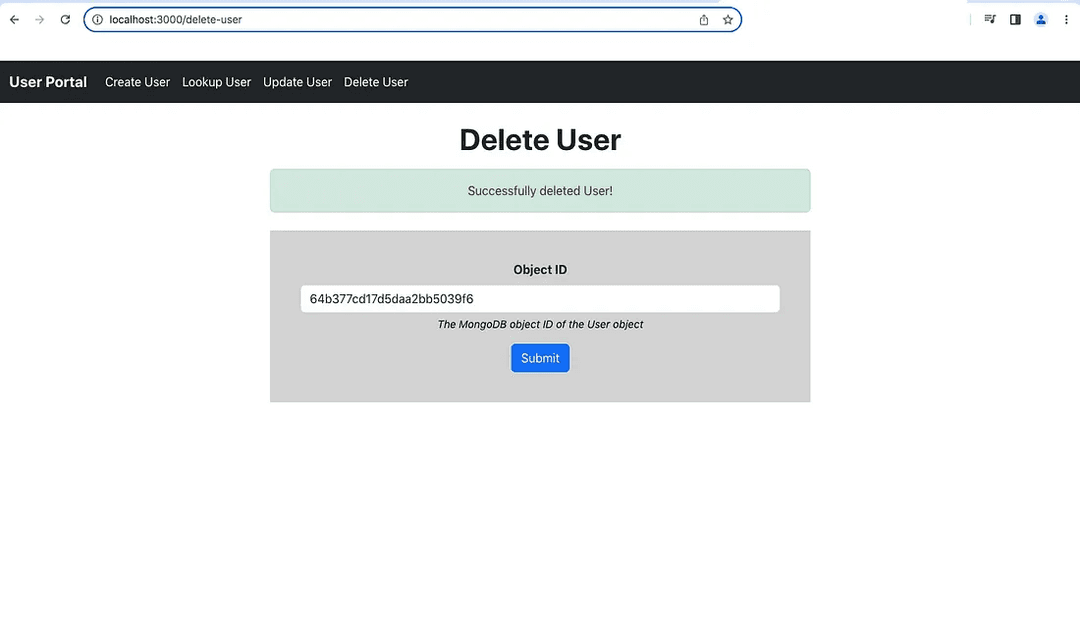
Delete User
And now finally, we will delete this newly created user. Head over to the Delete User section of the portal and similarly to looking up a user, we will use the built-in Object ID to delete this user.
If done correctly, you should get the following:
Conclusion
Phew! That was a lot to cover! We went in detail as to what MongoDB is and saw how easy it was to connect an instance to a Node server.
We also saw how the most common database interactions such as Creating, Reading, Updating, and Deleting data can be made easy using the Mongoose library.
Furthermore, we touched on concepts related to Relational/Non-Relational Databases, Operators, the Mongoose library, and so on.
This is just the basics though. You can get even more complex with the types of requests you can make with a database.
I will link the Github repository here.
I hope you enjoyed this article and look forward to more in the future.
Thank you!