Complete Guide to Automated Testing Using Selenium WebDriver
Deep dive into the Selenium WebDriver and best practices for testing web applications.

Abdullah Muhammad
Published on April 3, 2024 • 13 min read

Introduction
In the last tutorial, we looked at the Mocha.js library and utilized it to test a basic React application.
We worked with additional libraries such as Chai and Enzyme. Chai allowed us to perform assertions to determine if a test case passed or failed.
Enzyme allowed us to clone React components and test their validity using helper functions.
Today, we will explore another testing tool known as Selenium WebDriver and use it to test a React application. We will incorporate the Java programming language and create a separate Maven project to help with testing.
This tutorial assumes the reader is familiar with Java, Maven, and setting up a Java project.
What is Selenium WebDriver?
Put it simply, Selenium WebDriver allows for cross-browser testing. It enables developers to automate the testing process using a browser and check if a web application performs as intended.
Selenium WebDriver supports different programming languages such as Java, Node.js, Python, and C# as well as different browsers for running automated tests such as Firefox, Google Chrome, Safari, and Internet Explorer.
We access web elements on a specific web page and interact with those elements to check performance. Selenium WebDriver provides different ways of accessing page elements and interacting with them.
As noted earlier, Selenium WebDriver supports different browsers, but for each browser, there is a separate web driver associated with it.
We use that browser-specific web driver which is simply an executable file to automate the testing process. You can see tests running in real-time with the activity fully automated and visible in the browser.
Additional information on the different browser web drivers can be found here.
Web Driver Architecture
We will dive deeper into the web driver architecture supported by Selenium. The following diagram illustrates the Selenium WebDriver testing architecture:
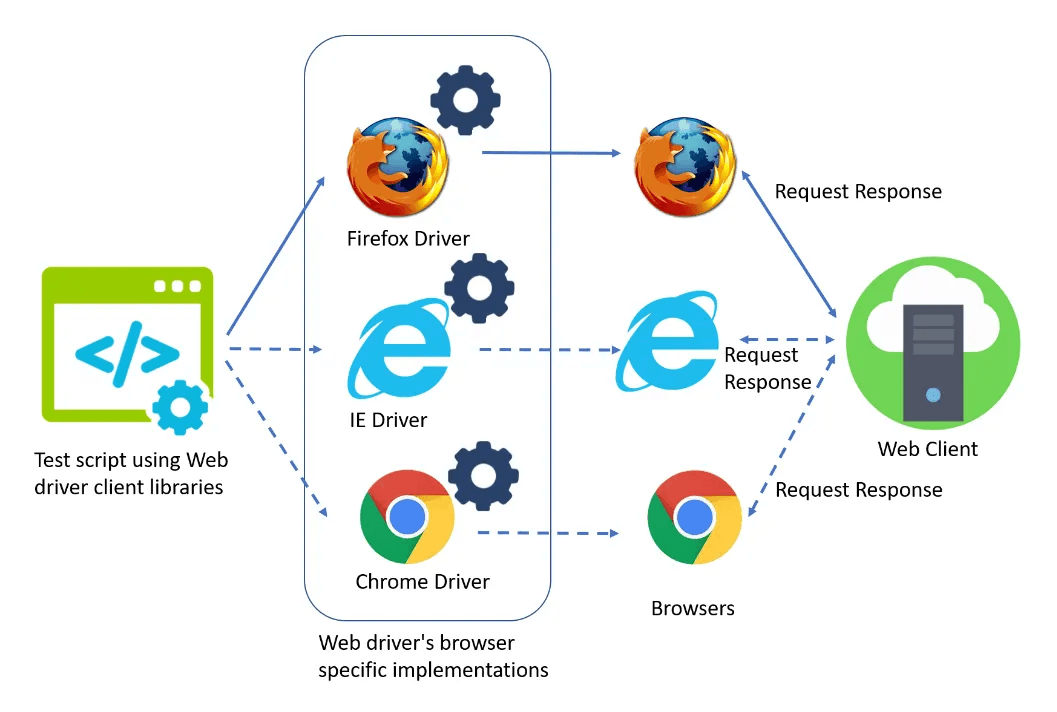
This is your typical client-server architecture we have looked at in the past. We write client test code using the Selenium WebDriver API to access and interact with page elements.
Depending on which browser we intend to run the client code, we will use that browser specific web driver. This will automate the testing process, as discussed earlier.
The web driver browser will work the same way a typical browser works. It will send and receive requests/responses to/from the client server.
There are several advantages to working with Selenium WebDriver. For one, it allows developers and testers alike to write test code which can be automated and ran across different browsers. This ensures performance metrics are met regardless of what browser a user uses.
The second advantage is that it allows developers to check for any bugs and seamlessly test the overall user experience
By supporting different programming languages, Selenium WebDriver offers flexibility to developers as they can write test code in any language they prefer to interact with the Selenium WebDriver API.
Selenium WebDriver API
The Selenium WebDriver API is comprehensive and allows developers to seamlessly test web page behavior. In this section, we will briefly walkthrough some of the core features the API has to offer.
Prior to invoking any action, we must instantiate the web driver using the built-in WebDriver class provided by Selenium.
We use the browser specific web driver class associated with the browser we want to work with.
The following is a list of common web browsers and their associated web driver classes:
- Mozilla Firefox — GeckoDriver
- Google Chrome — ChromeDriver
- Microsoft Edge Browser — EdgeDriver
- Microsoft Internet Explorer — InternetExplorerDriver
- Safari — SafariDriver
After successful instantiation, we proceed to use one of the core features offered by the API.
Waits
We can set a wait time between actions in order to ensure tests pass correctly. This helps us take into account the different nuances associated with web browsing.
You see, page load times vary and sometimes take longer than they should. Running tests with no wait times means they are at the mercy of the browser. If a page does not load in time for a specific test, the test could fail.
Other times, it may pass, but only because the page loaded in time. We can avoid this by universally setting a wait time between all actions.
There are two different waits in Selenium:
- Implicit Wait — Universal wait time is set between all actions using the implicitlyWait() function
- Explicit Wait — A specific wait time is set between specific actions and can be done using the Wait class
We time out the browser for a very brief moment before proceeding with an action (time is in seconds).
Locators and the WebElement Class
Aside from setting wait times, the Selenium WebDriver API also provides different ways of accessing web elements.
This, of course, is a major aspect of using this testing tool as we need a way of accessing and interacting with web elements.
Selenium WebDriver has a built-in WebElement class which contains different functions for interacting with web elements once they have been accessed.
We access web elements using the instantiated web driver and the findElement() function. This returns an object of type WebElement and allows us to use the different functions supported by it.
"But wait, how do we access elements using the findElement() function?"
Good question, we use locators provided by the Selenium WebDriver API to access page specific elements. The following is a list of the different locators:
- ID — Locates web elements by their ID attribute
- Name — Locates web elements by class name
- CSS Selector — Locates web elements by their CSS selector
- Tag Name — Locates web elements by their HTML tag name
- XPath — Locates web elements by their matching XPath expression
- Link Text — Locates anchor elements by their text
- Partial Link Text — Locates anchor elements partially by text, if more than one matching is found, the first one is returned
Of all the different locator methods available, XPath is chosen often for locating web elements. That is because each web element has its own unique XPath expression.
Other locator methods have the possibility of returning multiple web elements based on the specific search criteria.
All of these locators are provided by the built-in abstract By class.
The findElement() function takes in an object of type By and the By class contains all the different locator functions we just went over.
We can also obtain a list of web elements using the findElements() function. Based on a search criteria that returns multiple elements, we can interact with it using a List of objects of type WebElement.
Remember, we are accessing the web page elements using the web driver browser and the DOM. If you are not familiar with the HTML DOM, please refer to this tutorial before proceeding.
Web Element Interactions
Once we have accessed the different web elements, we can choose to interact with them in different ways.
The Selenium WebDriver API provides three different ways of interacting with web elements:
- Click
- SendKeys
- Clear
We can invoke the click action by simply using the click() function provided by the WebElement class.
If we accessed an input element, we can use the sendKeys() function to pass in a sample input value. A common use case is testing username and password input fields.
We can clear elements using the clear() function (applies to input and text editable elements).
These are some of the ways we can interact with web page elements.
Web Element Descriptions
Aside from accessing and interacting with web elements, the Selenium WebDriver API provides useful functions for describing web elements.
For instance, we can check if a particular element is displayed using the isDisplayed() function.
When validating a form, we can check to see if a specific button is enabled using the isEnabled() function.
We can verify if a particular element has been selected using the isSelected() function (check to see if a form element was selected).
We can also fetch different information such as the tag name, positioning, CSS values, element attributes, and text content using the getTagName(), getRect(), getCssValue(), getText(), and getAttribute() functions, respectively.
We can use assertions in the test code to ensure the acquired information using the functions above matches a given criteria.
More information on these functions and how to use them can be found in the official Selenium WebDriver docs here.
Browser Interactions
For the most part, when using the Selenium WebDriver API, we will be using it for accessing and interacting web elements.
However, there is a section in the API that allows developers to interact with the browser.
One such case is navigation. Upon launch, we need to specify the URL to where the web driver browser must navigate to. We do this using the get() function provided by the WebDriver class.
Once we have landed on the desired web page, we can navigate back and forth using the navigate() function.
We chain additional functions to navigate() on the web driver object such as to(), forward(), back(), and refresh() to make requested navigations.
The to() function takes in a string parameter specifying the URL string to where the web driver must navigate to. More information on navigation can be found here.
Window alerts are key browser interactions. Selenium WebDriver provides support for alerts by providing a built-in Alert class.
We check to see if an alert is present using the built-in ExpectedConditions class and the alertIsPresent() function.
We can get alert text to verify content using the getText() function. Additionally, we can confirm or deny an alert using the accept() and dismiss() functions.
If an alert is a prompt, the Alert class supports user input with the help of the sendKeys() function which we explored earlier.
Finally, windows are a key feature when working with web browsers. In any given session, we often have multiple tabs/windows open. The Selenium WebDriver API supports windows.
We can access the ID of the current window the web driver is on using the getWindowHandle() function.
We can also check to see if multiple windows are open using the getWindowHandles() function. This returns a list of window IDs and if the size is greater than one, we know multiple windows are open.
We can switch between windows using the switchTo() function provided by the WebDriver class and providing the window ID using the window() function.
We can create new windows/tabs using the newWindow() function as well as closing existing windows/tabs using the close() function.
We can adjust window size to whatever we like. For instance, if we want to maximize/minimize a window, we use the maximize()/minimize() functions to do that, respectively.
Finally, we can safely quit the entire testing session by simply invoking the quit() function provided by the WebDriver class.
If this seems a bit confusing, all this will make sense in the subsequent sections of this tutorial.
We will walkthrough the entire automated testing process and see the Selenium WebDriver API in action.
Code Overview
You can follow along by cloning this repository. The directory of concern is /demos/Demo40_Selenium_WebDriver_Testing/webapp/selenium_test.
We are using Java to test the web application. The entirety of the web application is located in /webapp/src/Components and we make use of React.js to build it. It is a simple application consisting of HomePage, Navbar, and SearchPage components.
Feel free to explore those components, but the focus for this tutorial will be on Selenium testing.
We will be using Google Chrome as the browser for automating the testing process. You will find the Google Chrome web driver executable file located in /webapp/selenium_test/src/main/java/pages/chromedriver.exe.
Java and the Maven Repository
Node.js consists of the Node Package Manager for dependency management. Java’s equivalent is Maven. The Maven repository allows one to incorporate third-party packages into their Java projects.
You need to create a Maven project in Java. If you are familiar with the Eclipse IDE, creating one is very simple.
Every Maven project consists of a pom.xml file which details all the dependencies of the project. This is similar to the package.json file found in Node.js projects.
For more information on packages and dependency management, please refer to this tutorial.
The pom.xml file for this project is located in /webapp/selenium_test/pom.xml:
This allows us to import the different Selenium classes and work with testing the different React components.
Home Page Component Tests
For testing the HomePage component, you will find tests for it in /selenium_test/src/main/java/pages/HomePageTest.java:
We set the System property to incorporate the Google Chrome web driver and point it to the location of the executable file (same location as this file).
We proceed to instantiate a web driver object using the WebDriver class, as discussed earlier. We set an implicit wait time of two seconds and maximize the size of the screen.
It is assumed the React application is running prior to running any tests. We navigate to localhost:3000 where we should see the HomePage component displayed on screen.
From here, we make use of two private methods that test the features of the HomePage component to ensure it is displayed correctly.
We fetch the title and paragraph text elements using the By class and the tagName() function.
If all holds true, the console should print true for each test. Finally, we end the session using driver.quit().
Navbar Component Tests
For testing the Navbar component, you will find tests for it in /selenium_test/src/main/java/pages/NavbarTest.java:
Similar to the HomePageTest class, we follow the same process for setting up and using the web driver.
We navigate to the home page of the React application and fetch a list of anchor elements from the Navbar component displayed on screen.
We fetch them by tag name using the By class and the tagName() function. We ensure there are only two links (size of the list should be two) and check the content of each anchor element.
One anchor element should point to the home page and the second one should point to the SearchPage component. After that, we simply close the session using driver.quit().
Search Page Component Tests
For testing the SearchPage component, you will find tests for it in /selenium_test/src/main/java/pages/SearchPageTest.java:
This the most extensive testing we have explored so far. It incorporates many of the key features of the Selenium WebDriver API, as discussed earlier.
Setup is the same as before. We navigate to the home page of the React application and search for and select the Search Page anchor element.
We verify the size of the anchor list (should be two) and verify the URL of the site using the getCurrentURL() function provided by the WebDriver class.
Next, we verify the existence of the title, paragraph text, input field, and the button web elements. We do this by using the By class and the tagName() function.
Fetching by tag name using h3, i, input, and button suffices as the SearchPage component is straight forward.
After that, we verify that one input field exists and send information to it using the sendKeys() function. We select the button element using the click() function.
This displays an Alert which we can retrieve using the built-in Alert class provided by Selenium.
We switch to the Alert window using the switchTo().alert() function provided by the WebDriver class.
We ensure the text on the Alert component matches what is expected and close it using the dismiss() function.
All these tests should pass and return true. At the end, we simply end the session using driver.quit().
Tests are designed to be dependent on previous test results. If any fail, the session ends immediately as noted by the if-else clauses.
This concludes the walkthrough of the test code!
Demo Time!
We will now walkthrough a quick demo of the entire testing process. It is assumed you have cloned the repository above. You will need to import the selenium_test folder in a Java IDE of your choosing.
Remember, this tutorial assumes you are familiar with Java and setting up a Maven project on your own. For your convenience, you will find a .jar file located in /demos/Demo40_Selenium_WebDriver_Testing.
You can think of this as a zip folder containing all the relevant Java code needed to successfully run the project. You can simply import this and have the project setup that way.
Before running any tests, we need to ensure the React web application is running.
To do this, ensure you have installed all the necessary dependencies by running npm install in /demos/Demo40_Selenium_WebDriver_Testing/webapp.
After that, simply run npm start to kickstart the client server on Port 3000.
Inside the Java project, navigate to the src/main/java/pages package. You should see the three different classes along with the chromedriver.exe file.
Select any of the classes and hit run in the console (option should be at the top of your IDE).
The starting point for any code in Java is the public static void main() method.
From here, you should see the web driver in action launching a new Google Chrome window and navigating to http://localhost:3000.
Everything is automated so once you hit run, you do not need to do anything else except watch the entire process.
It is fascinating to see the clicks and the inputting of characters happening on its own without any user intervention.
You will need to run each test class individually which you can do by selecting a specific class and selecting run at the top.
Once everything is complete, the console will notify you of the results. If all goes accordingly, you should see true for all the test cases for each of the three components (HomePage, Navbar, and SearchPage).
Conclusion
We covered Selenium WebDriver in great detail and explored many of its rich features.
Selenium WebDriver is a versatile tool that enables developers and testers alike to automate the testing process and analyze performance in real-time.
Supporting cross-browser functionality enhances the testing process and improves overall user experience. It is a testing tool that every developer and tester should be familiar with.
We looked at many of the different classes provided by the Selenium WebDriver API such as WebDriver, WebElement, and By.
We looked at the different types of web drivers and explored the different ways of interacting with the web driver including navigation, window sizing, and setting different wait times between actions.
We focused on locators and explored different ways of locating web elements and performing actions on them (sending values, clicking, etc.).
We explored Maven and used the Java programming language to create test classes representing the different React components to be tested.
In the list below, you find links to the GitHub repository, the official Selenium WebDriver docs, and the Maven Repository:
As always, I hope you found this article helpful and look forward to more in the future.
Thank you!