Comprehensive Guide to Next.js 15 App Router
Learn everything about Next.js 15 App Router and utilize it to develop full-stack web applications.

Abdullah Muhammad
Published on February 13, 2025 • 14 min read

Introduction
Been a while since I have written one of these! Today, we will focus on a popular web framework, Next.js. In the past, we explored various JavaScript libraries and frameworks such as React.js, Express, etc.
We know that React.js is nothing more than a UI library allowing developers to quickly develop and re-use custom components for constructing SPAs (Single-Page Applications).
The MERN stack (Mongo, Express, React, Node) closely follows the MVC (Model-View-Controller) design pattern where React.js acts as the “view” in this setup.
While React.js is a robust library with rich add-ons such as React-Router, Redux for state management, it leaves out some important features related to web development.
Namely, SEO and SSR. React is used for generating SPAs and is a client-facing library.
As it relates to execution time, content is dynamically rendered browser side. Browsers such as Google have a difficult time crawling web pages for data related to page indexing and SEO.
Next.js solves this problem by building on-top of React.js offering SSR (server-side rendering) and SSG (static-site generation).
We explored SSR and SSG when we covered template engines using Node.js.
Vercel is the owner of the Next.js framework and as we saw in a previous tutorial, it offers a seamless service for hosting web applications and is specifically optimized for Next.js application deployment.
A free and easy to use service makes it a go-to choice for many developers. No additional costs related to cloud computing, setting up EC2 instances, worrying about safely storing environment variables, etc.
Key Features of Next.js
There are key features that Next.js offers which are optimal for web development. Below are some of these features:
- File-based Routing — No need to work with React Router as you build out your routes using directories and files in the app directory
- Incremental Static Rendering (ISR) — Rebuild pages incrementally
- File-based API Routes — No need for a separate server for handling back-end routes as all back-end routes can be created using files within the api directory
- Tailwind CSS/TypeScript Support — No Bootstrap or other CSS frameworks need to be added
- Dynamic Imports — Load code that is required improving performance
- Image/Link Optimization — Special built-in components provided by Next.js for Image and Link optimization
- Metadata for SEO — Seamlessly add metadata to pages for SEO
These are just some of the benefits you get while working with Next.js. We also get TypeScript and JSX support as well as two ways of developing Next.js applications:
- Pages Router — Traditional method of developing Next.js applications
- App Router — Introduced in Next.js 13
In this tutorial, we will focus on using the App Router for building a Next.js application.
Next.js Components
Next.js also incorporates directives that you can inject into your components such as use client and use server. There are two kinds of components in Next.js:
- RSC (React Server Components)
- Client Components
As the names imply, RSCs are components rendered server side offering you the full benefits of Next.js.
The second class of components are client side rendered which allow you to fully utilize React.js features such as managing state and utilizing hooks.
By default, all components created in Next.js are RSC by default. You can change this by using the aforementioned directive above (use client) in the component file.
“So, when to use each?”
Typically, you want your main pages to be RSC and any custom components within them to be RSC or client components.
Next.js Special Pages and File-Based Routing
As mentioned earlier, Next.js offers file-based routing. All client and server code resides in one directory called app.
Next.js offers six special pages we can use for development:
- page — Files that contain the actual code for the page or component to be loaded
- route — Files that contain back-end code for handling API requests
- error — Files that load when there is an error loading the page file (i.e. request to fetch data does not work)
- not-found — Files that load when accessing a non-existent route
- layout — Files that contain code that enhances page design/layout
- loading — Files that load when a particular page is loading in the background
Since we are using file-based routing for navigation, the special file closest to the page file is the one that loads.
The following diagram illustrates what I mean when we talk about file-based routing:
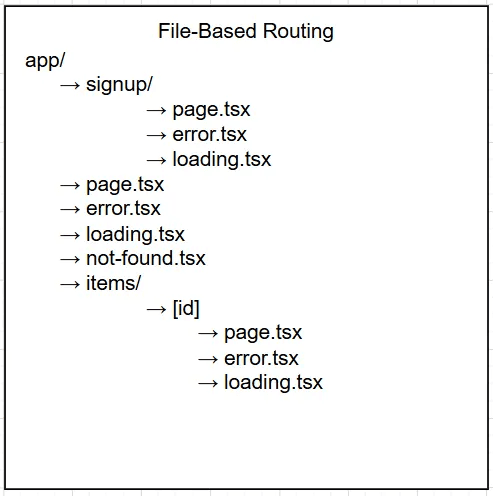
This is how it works, we define different route segments using directories and incorporate the page file (page.tsx) to contain the component code.
The special files that load for a specific page in a given scenario are the ones closest to it in this so-called file tree.
Meaning that, we start at the location of the specific page file and work outwards until we find and load the specific special file for the scenario.
For instance, if we tried to access /signup/form/ by entering this specific URL in the browser, we would be met with the not-found.tsx file located at the root because there is no directory associated with this path segment, but also, that is the only not-found.tsx file located in this project.
Using this logic, you can safely assume that for the page located at /signup, the error and loading files located there are the ones that load when there is an error loading the sign up page and so on.
By no means are you obliged to add each of these special files to each of the route segments. At the end of the day, it is your call as to what makes sense as you build out your Next.js application.
We also get dynamic routing with Next.js using slugs. We can define a slug using a directory and naming it using square brackets /items/[id]/page.tsx.
We can access the id from the dynamic route as a function parameter within the page file.
There is much more to routing such as route groups, interceptors, and catch-all routes, but for an introductory tutorial, this is a solid foundation for understanding Next.js file-based routing.
For more information on routing, you can read up the official docs here.
Next.js API File-Based Routing
Similar to page navigation, Next.js extends file-based routing to the back-end.
Instead of relying on a separate server for handling back-end routes (as we typically do when working with the MERN stack and Express.js), we can seamlessly integrate server side logic into the app directory in a special sub-directory called api.
Aside from file-based routing, no special files are incorporated except the route.ts file. As the name implies, back-end logic for the specific route is added here.
For the same route.ts file pertaining to a given route, we can define separate functions using the same naming convention GET, POST, etc. within the same file if we have a different method type for the same route.
Dynamic routing is also supported using the slug convention seen earlier and accessing back-end routes from the front-end is done using the /api prefix.
The following diagram neatly summarizes how back-end routing works with Next.js:
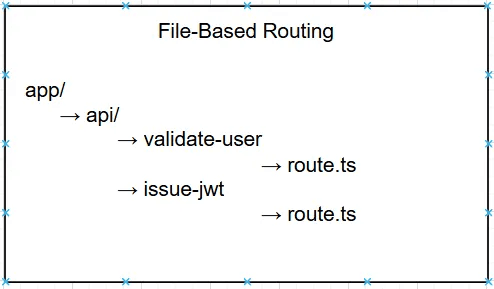
No need for absolute paths, you can simply use a relative path for a specific API call. For instance, /api/validate-user or /api/issue-jwt, and so on.
Next.js Optimization and Environment Variable Support
Next.js offers key optimizations for images, links, and SEO. Next.js provides custom image and link components which optimize a page containing these features.
You can readily add metadata to RSCs using the Metadata API provided by Next.js and export an object of type Metadata detailing information to improve SEO.
We will see these nice features in the code overview section of this tutorial. Next.js also supports environment variables. No need for installing third-party packages for handling secrets as we have seen before with the dotenv package.
You simply define a .env file in the root location of the app directory and store all your secrets there.
Like before, you can access those secrets using the same notation we have seen before (process.env.<SECRET_NAME>) and no import statements are required.
By default, secrets are only accessible by your React server components and back-end API routes. If you want to expose them to client components, you will need to use the NEXT_PUBLIC as a name prefix for the particular secret.
There are more features such as server actions and granular loading using Suspense which you can read more about in the official docs.
Code Overview
You can follow along by cloning this repository. The directory we will work with is /demos/Demo54_NextJS_App_Router/app_router.
You will find the complete implementation of a Next.js application inside and we will walk through the key cogs of the whole thing.
To create a Next.js application, you can run the following command in the command line:
npx create-next-app@latest .This will prompt you to answer a set of questions related to project setup.
Once everything has been setup, you can kickstart the server on port 3000 by running:
npm run devThis will open up the Next.js home page provided to you by default. All you need to do now is make edits to this project and build out the custom Next.js project you want.
The codebase contains a lot of files which can be overwhelming, but most of these are simply configuration files related to Next.js, Tailwind, etc.
Let us dive in the front-end portion of the code.
Front-end App Special Files
Open the codebase in any IDE of your choosing.
We will be focusing on the src directory containing file-based routing, component files, utils directory, and the api back-end routes directory:
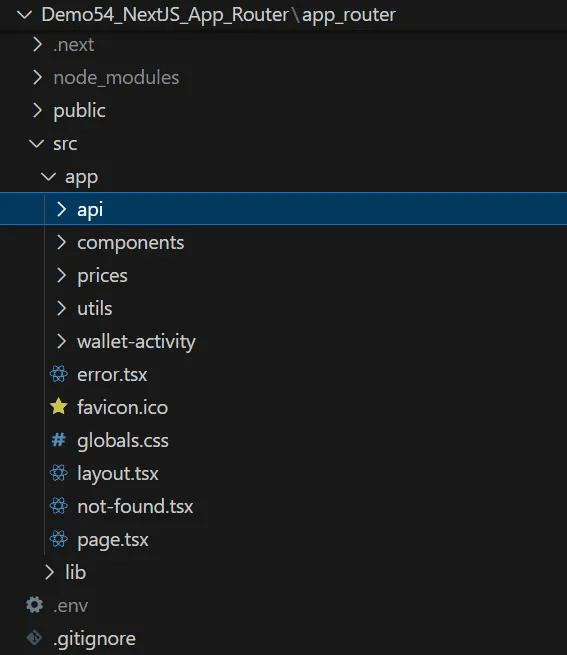
The following diagram illustrates file-based routing for the front-end:
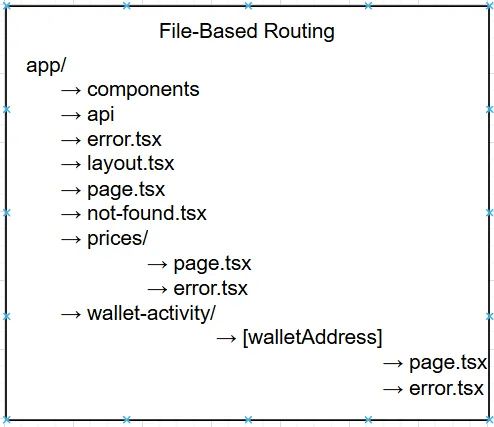
Let us explore the project at the root level and look at the page.tsx file along with the other special files. The globals.css file contains all the relevant CSS styling to be used in the project.
You can import custom fonts here as well (Google Fonts) and other information related to CSS styling.
Notice the .env at the root of the project containing all the secrets to be used and the different files we talked about earlier. This is what the layout.tsx file at the root looks like:
Most of the content of this file is provided by default (when we install the project), but we made a few modifications.
Notice how we are wrapping each page component (children) with the Navbar and Footer components.
We also define Metadata for the home page by exporting an object of type Metadata in this layout file.
Now, let us look at the not-found.tsx file which is also located at the root:
We simply define a function, NotFound() and utilize the Link component provided to us by Next.js for optimizing navigation.
For handling errors, we got the error.tsx file for that and it looks like this:
error.tsx is a client component page and it contains the necessary page code to display when encountering an error.
Most of these files can be replicated across different route paths, but ultimately, you decide what you want to display to your users.
Front-end App File-Based Routing
Now, we look at how we implemented file-based routing for the front-end. Starting at the root, you will notice this page.tsx file:
This is what the user sees when we kickstart the dev server. Again, we incorporate Metadata into the project and utilize a custom client component for handling form submissions.
Here is that custom HomePageWalletForm component:
If you have worked with React, this should be fairly straight forward.
Note the use client directive at the top indicating that this is a client component. We are making use of React state and a hook, useRouter() for dynamically routing to a page upon form submission.
We validate the wallet address of the user by using a custom function for completing the validation process.
From the file-based route diagram above, note how we are setting the dynamic route segment containing the [walletAddress] value in the router hook.
We access the slug value via function parameters in the page.tsx file for this particular route /wallet-activity/[walletAddress]:
We access the dynamic path segment value and utilize it in another custom component that portrays wallet statistics.
Instead of relying on state management libraries such as Redux, we can readily pass important information via dynamic routes.
Feel free to explore the WalletStatsInfoTable component inside the components directory.
Finally, we have the Prices page (/prices/page.tsx) which you can look at as well. It consists of a similar setup, the main file is a RSC and it contains a nested client component that handles data fetching:
Again, we make use of the custom table component provided by the Shadcn/ui library and make use of a special hook similar to useQuery known as useSWR.
useSWR is optimized for Next.js applications and consists of features such as revalidation and caching queries.
Like useQuery, we provide the API route URL, request parameters, and a custom function that handles the data fetching process.
In this case, the function is called PostFetcher and can be found in the utils/functions directory.
Instead of relying on the useEffect hook for data fetching, we can efficiently fetch data using useSWR (as before with useQuery) and conditionally render the table component.
Feel free to explore more about useSWR in the official docs here.
One key thing to add before we move to the next section is the next.config.ts file.
When working with images, Next.js blocks any external image sources unless the domain is explicitly specified in this config file.
The file is always located at the root and this is what it looks like:
As you can see, we add the external image source for viewing purposes within the NextConfig object. We can add as many domains as we like from wherever we are fetching images from.
This concludes the walk through for the front-end portion of the code.
Back-end File-Based API Routing
Now we switch and focus on the back-end. The following diagram illustrates file-based API routes used in this project:
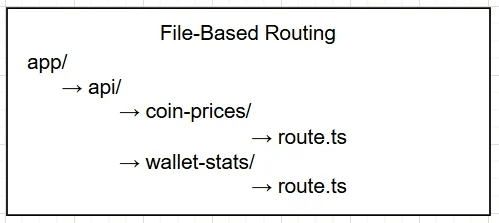
There are only two routes, one is a GET route and the other is a POST route. Recall that if we have more than one method type for a given API route, we define a function with the same name as the method type within the same route.ts file.
Here is that back-end route for fetching coin price data /api/coin-prices/route.ts:
We utilize the built-in Fetch API for data fetching and NextResponse provided by Next.js for conditionally returning data.
We are making use of the pro version of the CoinGecko API so you will need to subscribe to an API plan for this to work.
Finally, we have the POST route for returning data related to wallet statistics /api/wallet-activity/route.ts:
This is pretty much the same except that we access the body values using the Request object and perform the necessary data fetching operations.
Here too, we are making an authenticated API call so you will need an API key for this. You can get one for free when you signup with Moralis.
Secrets are stored in the .env file and that is where you should be storing these two API keys.
This concludes the code overview portion of the tutorial.
Demo Time!
That was quite a bit to walk through. The snippets are long, but most of it is React code and easy to follow.
We now do a live demo in the development environment.
Assuming you have cloned the repository from above, you should run npm install inside the /app_router directory to install the necessary dependencies as well as add in the two API keys in a separate .env file of your own.
Running npm run dev should yield the following:
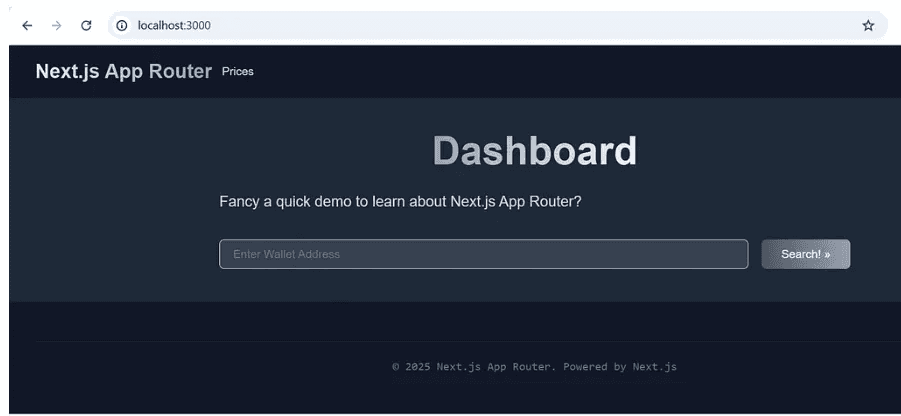
You can see the home screen of the deployed application where you see the Navbar and Footer components displayed as well as the HomePageWalletForm component we saw earlier.
Entering a valid wallet address should navigate you to the following:
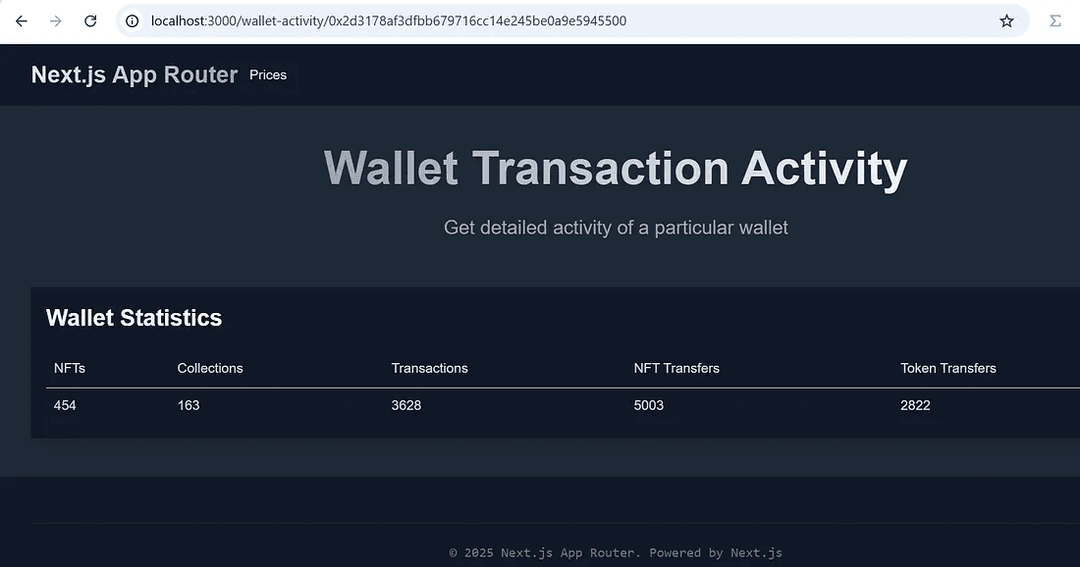
At the top, you can see the dynamic route /wallet-activity/[walletAddress] with the [walletAddress] portion replaced with the actual wallet address you were searching.
This page will load and render the table differently for each valid wallet address value by accessing the [walletAddress] property.
This is what is displayed when I enter an invalid wallet address:
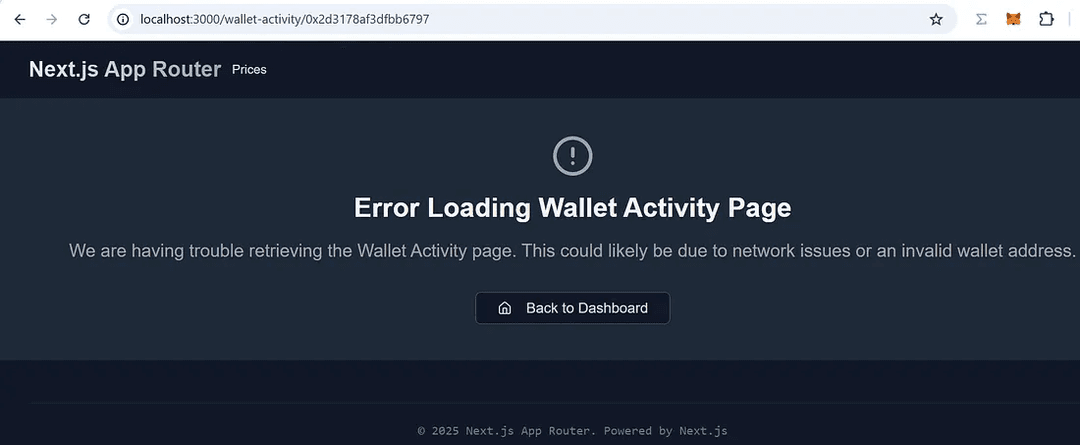
The closest error.tsx page loads when this event occurs so you can see the special files are working accordingly.
When I try to enter a completely different URL (with no file-based routing associated with it), I get the following:
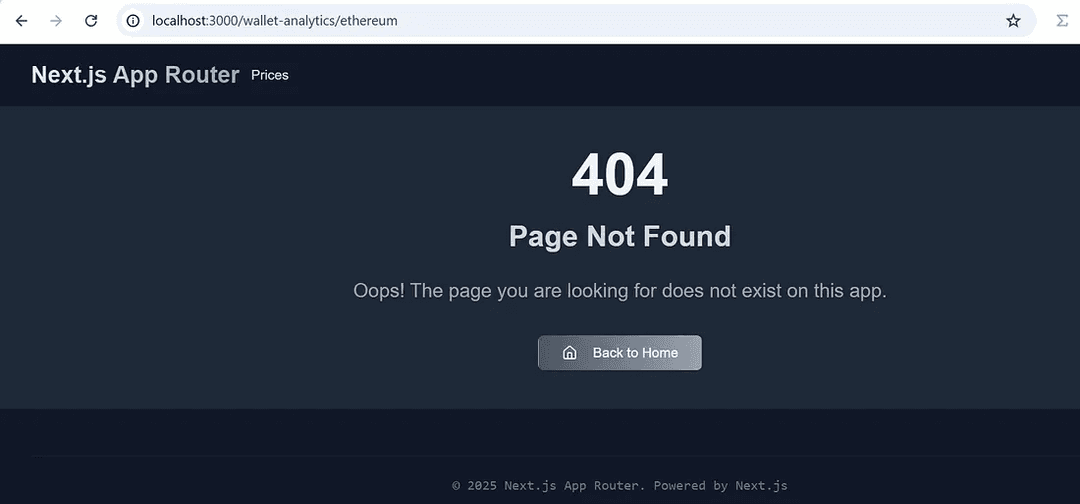
As you can see, the not-found.tsx page also loads accordingly and works as intended.
Finally, we look to explore the prices page. Selecting it at top in the Navbar should yield the following:
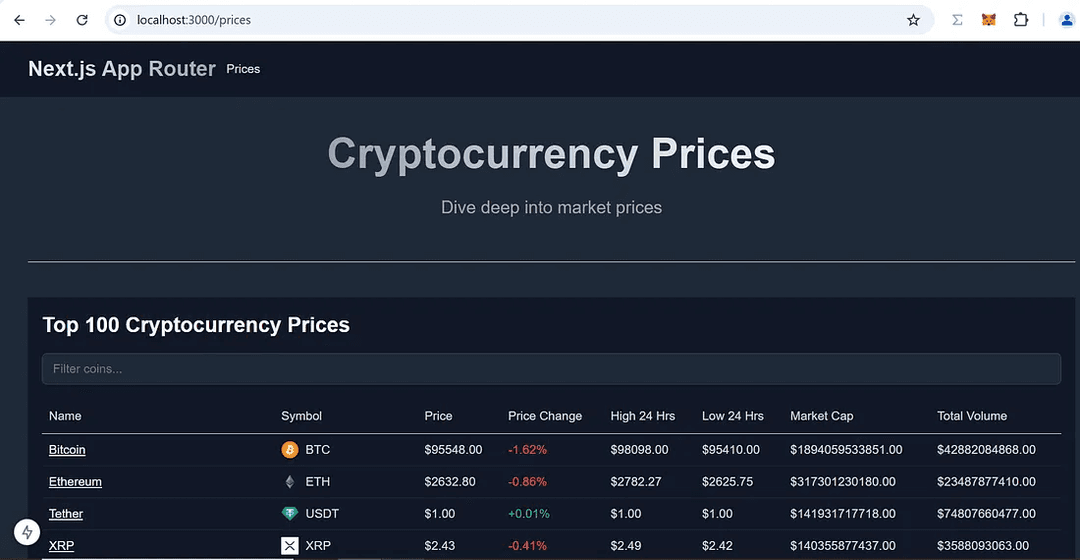
You can filter through the names of the coins in the filter section of the table as you see fit.
That is all there is to this short demo. Feel free to experiment and play around with this Next.js application. Try testing the different error.tsx pages for the different route paths and so on.
This setup was essentially the blueprint of how I built the Ethereum Dashboard which I will cover in greater detail in a future tutorial along with Vercel Next.js production deployment.
For now, suffice to say, this is enough material for one tutorial!
Conclusion
All in all, we covered quite a bit related to web development using Next.js 15 App Router.
The following is a detailed list of what we covered in this tutorial:
- File-based routing for both client and server side
- Shadcn/ui Library
- RSC/Client Components
- Dynamic/Slugified Routing
- Data fetching using useSWR
- Custom Component Setup
- .env files for storing secrets
- Six special files (layout, route, page, error, not-found, loading)
- Image/Link Optimizations (Custom Next.js components)
- Metadata (for SEO)
- Configuration Files (adding external image sources via next.config.ts)
And so much more!
In the list below, you will find links to the official Next.js App Router docs, shadcn/ui library, useSWR package, and the GitHub repository used in this article.
I hope you found this article helpful and look forward to more in the future.
Thank you!